Winter Portraits

Compilation of the wintery photos of myself and friends.
Recently I've gotten into the habit of doing themed portrait shoots with my friends. Both as practice for myself and just because its a fun way for us to all hang out. Get together and take turns hamming it up right?
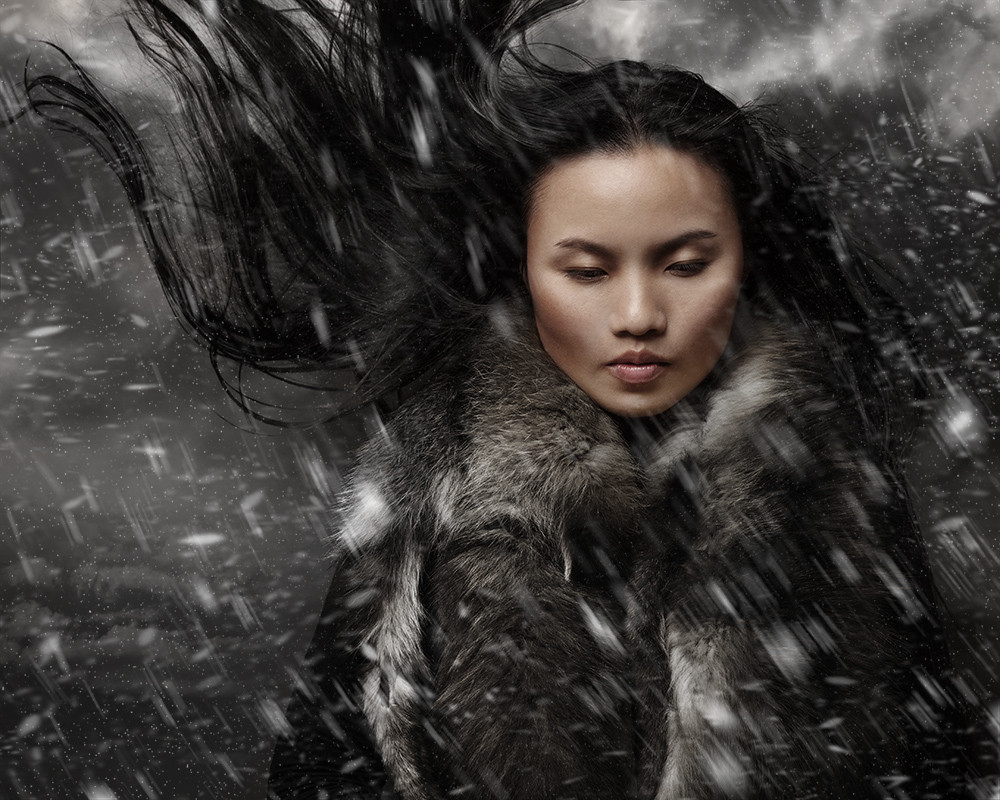
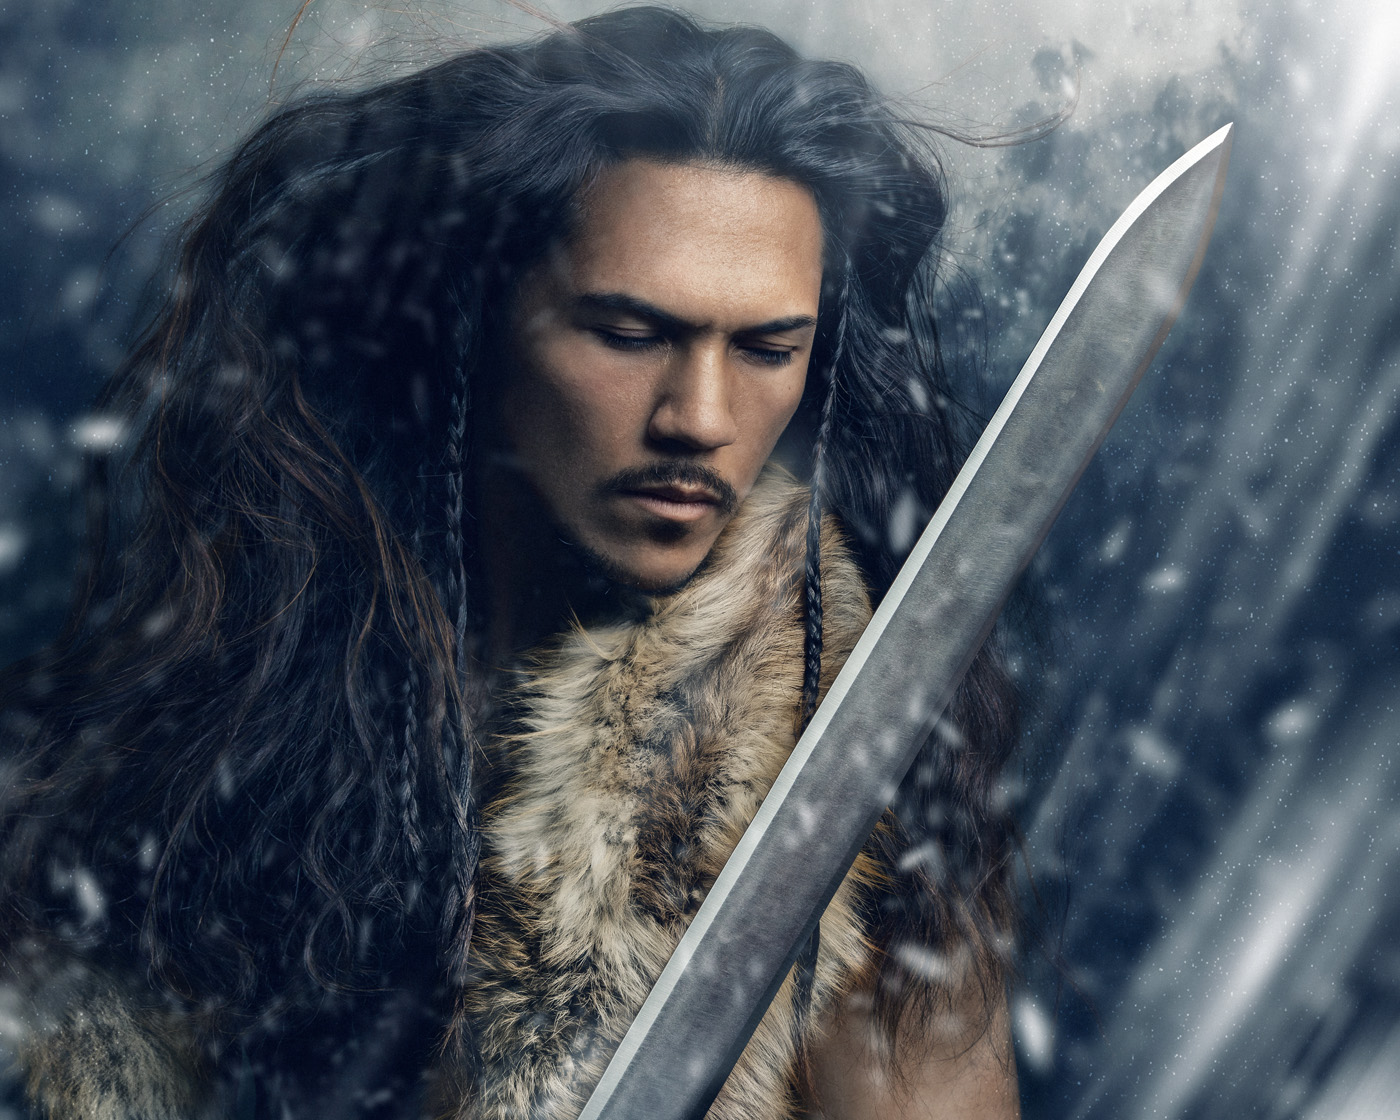
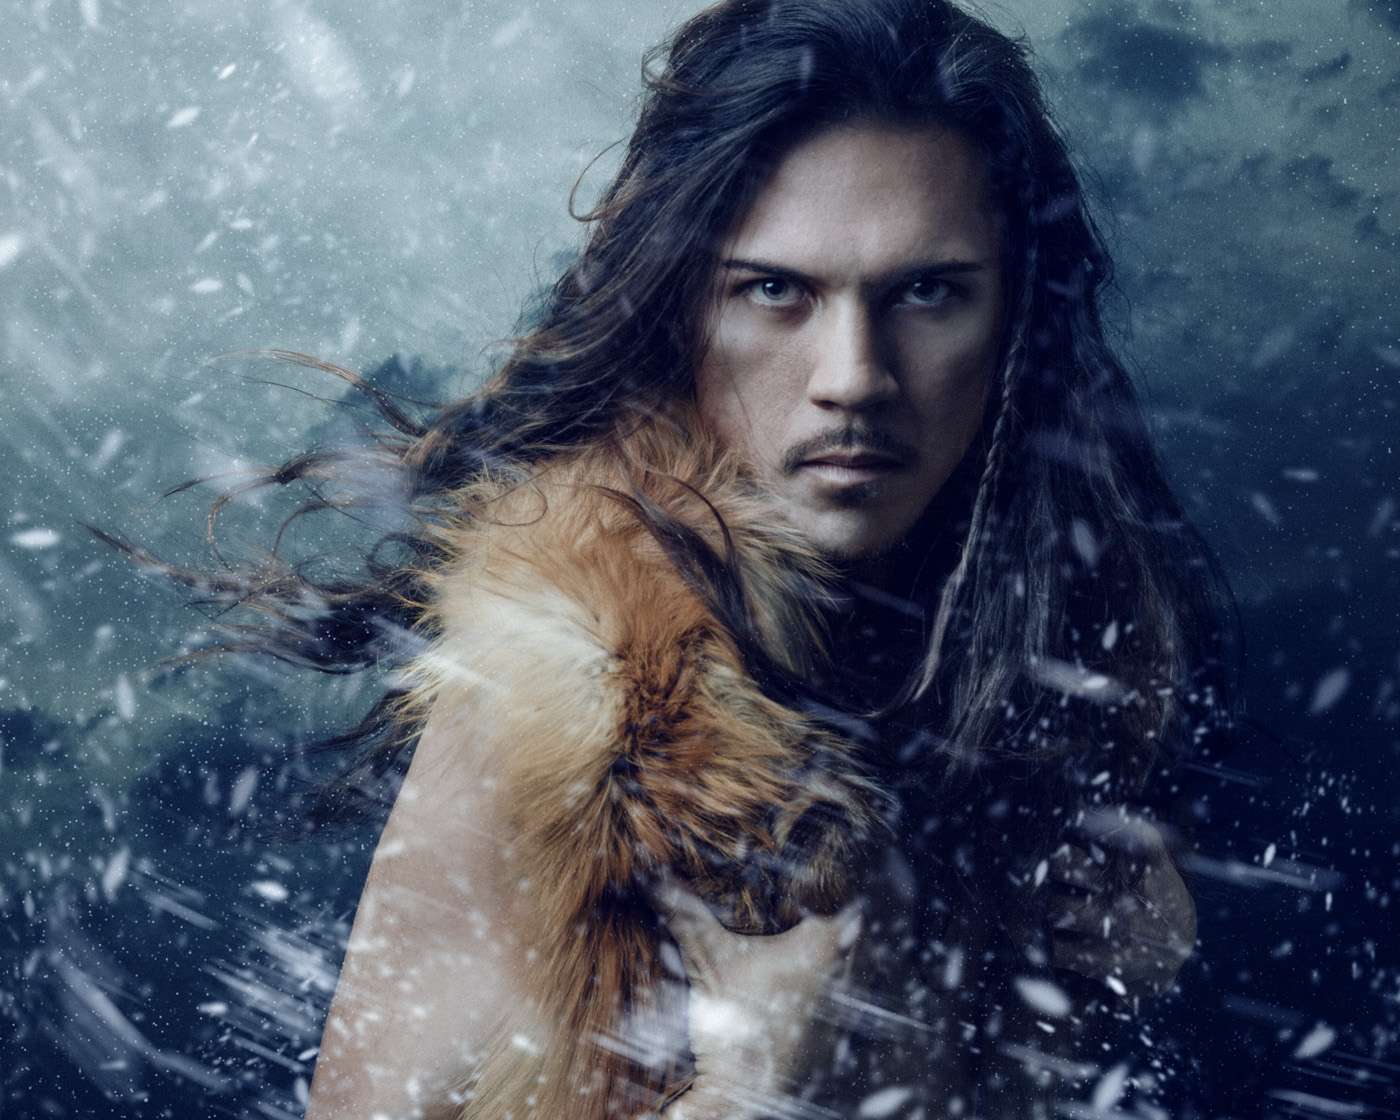
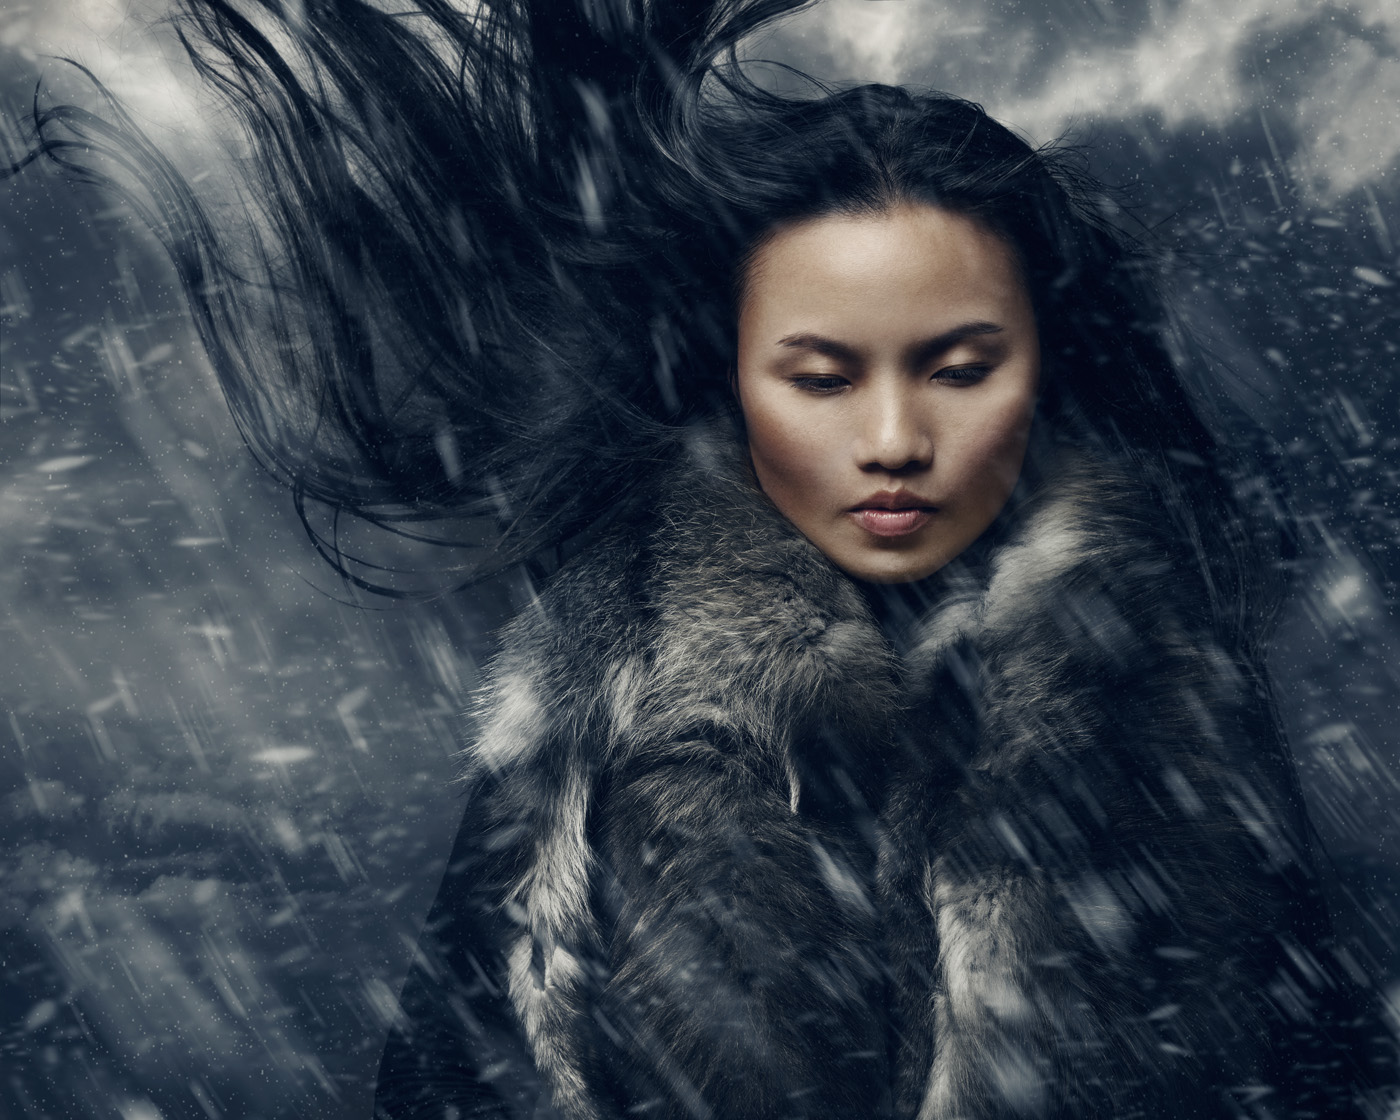
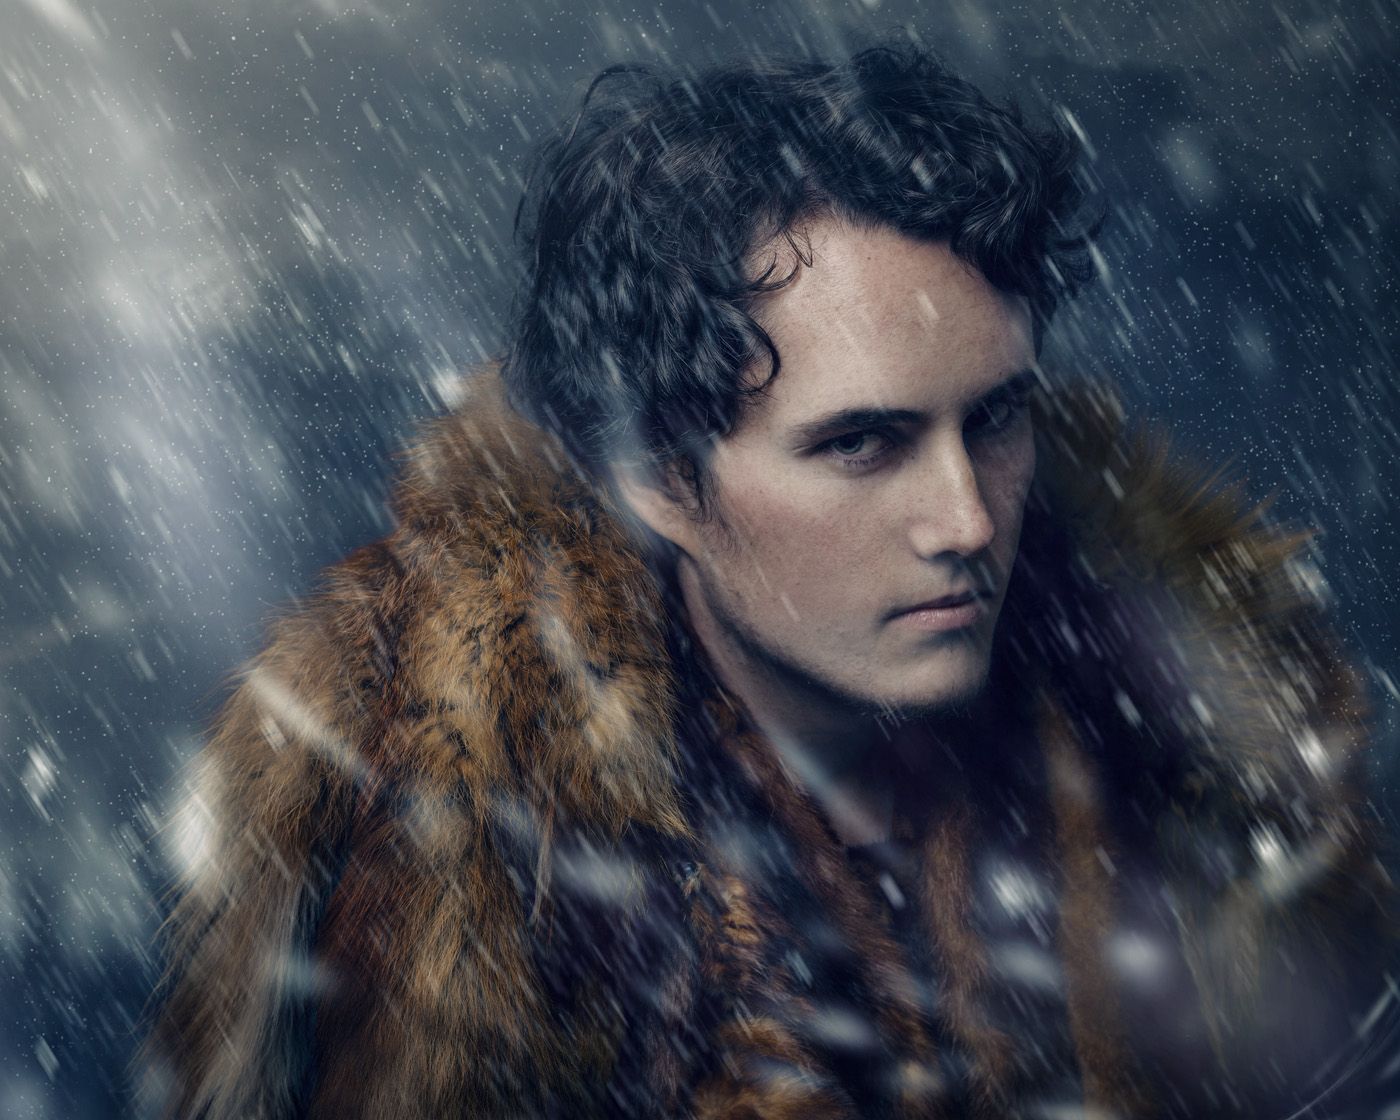
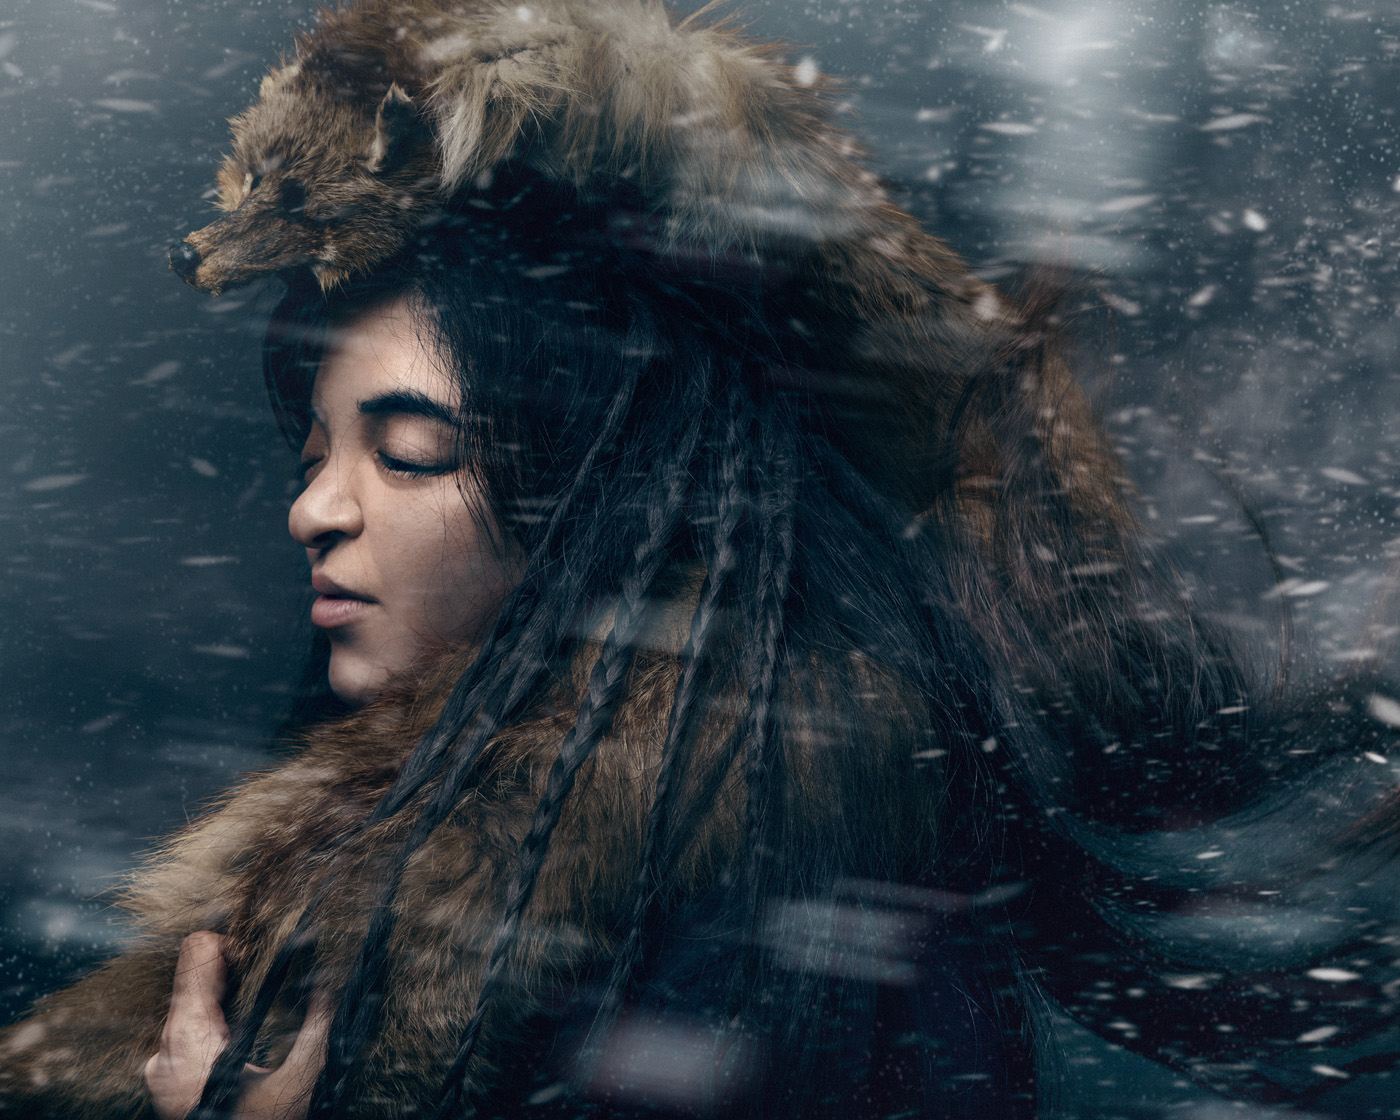
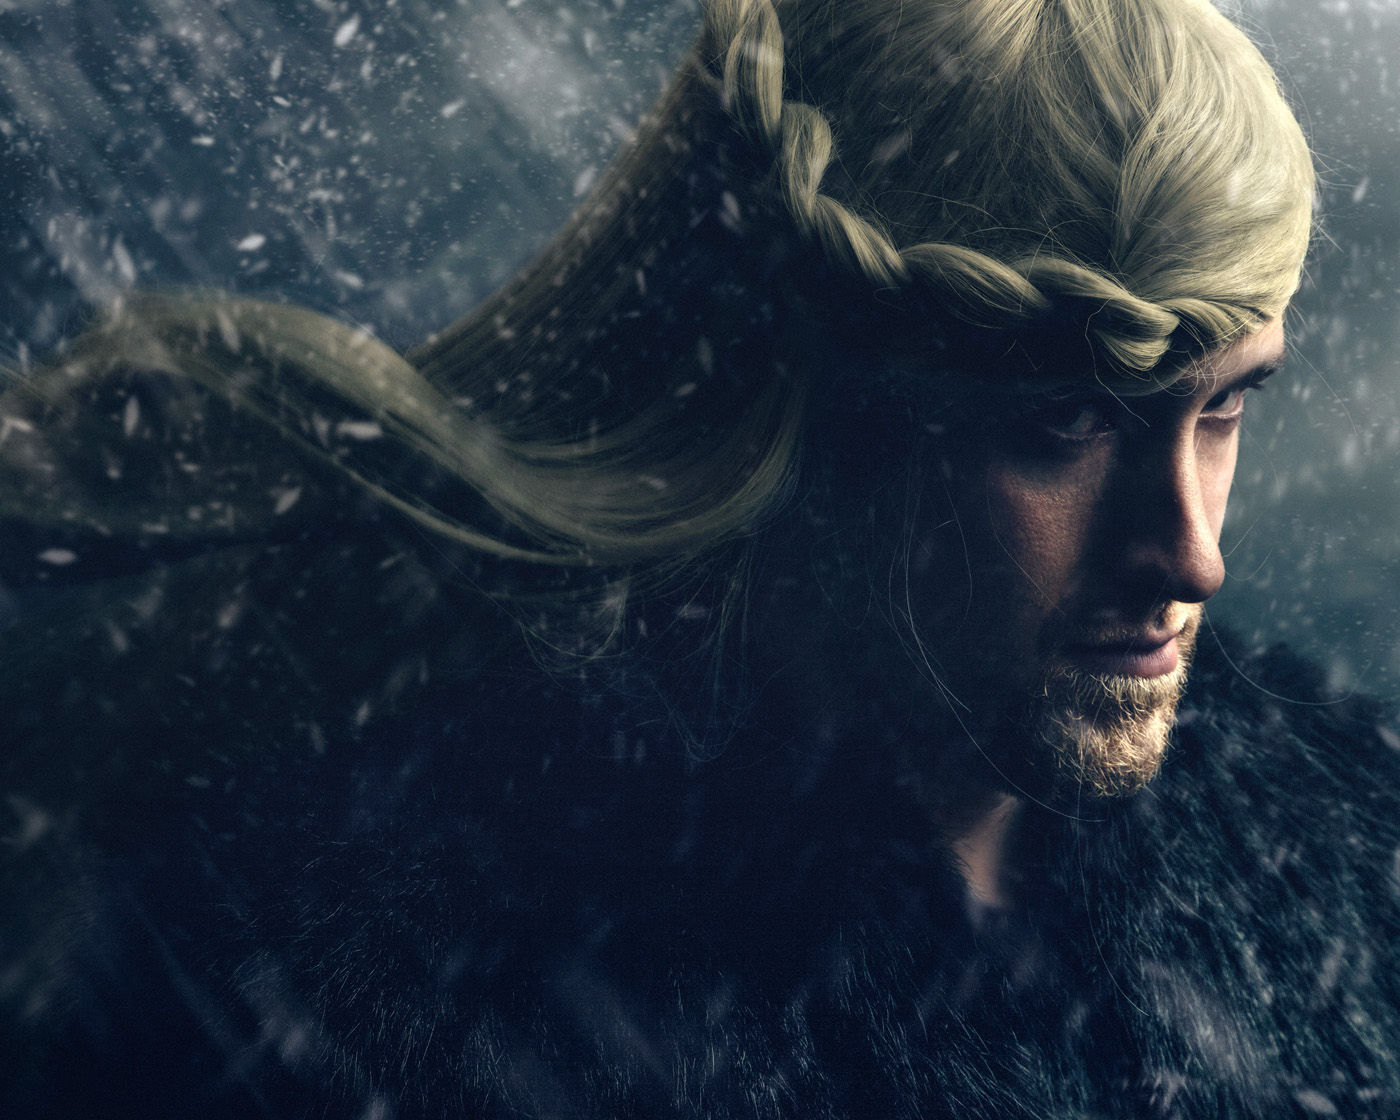
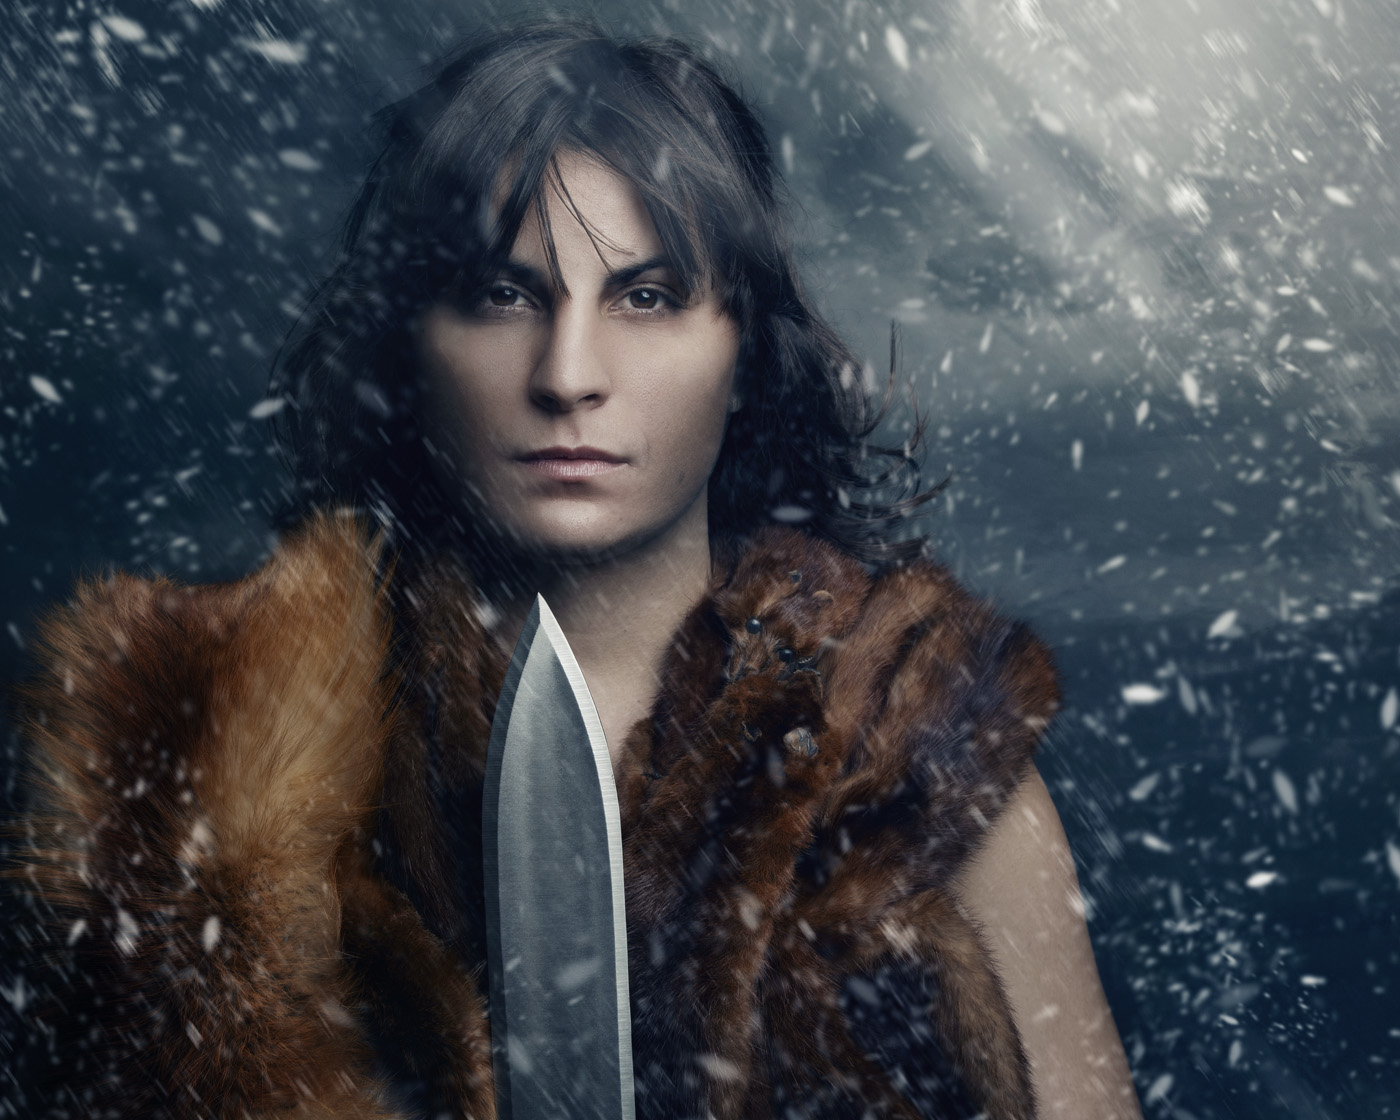
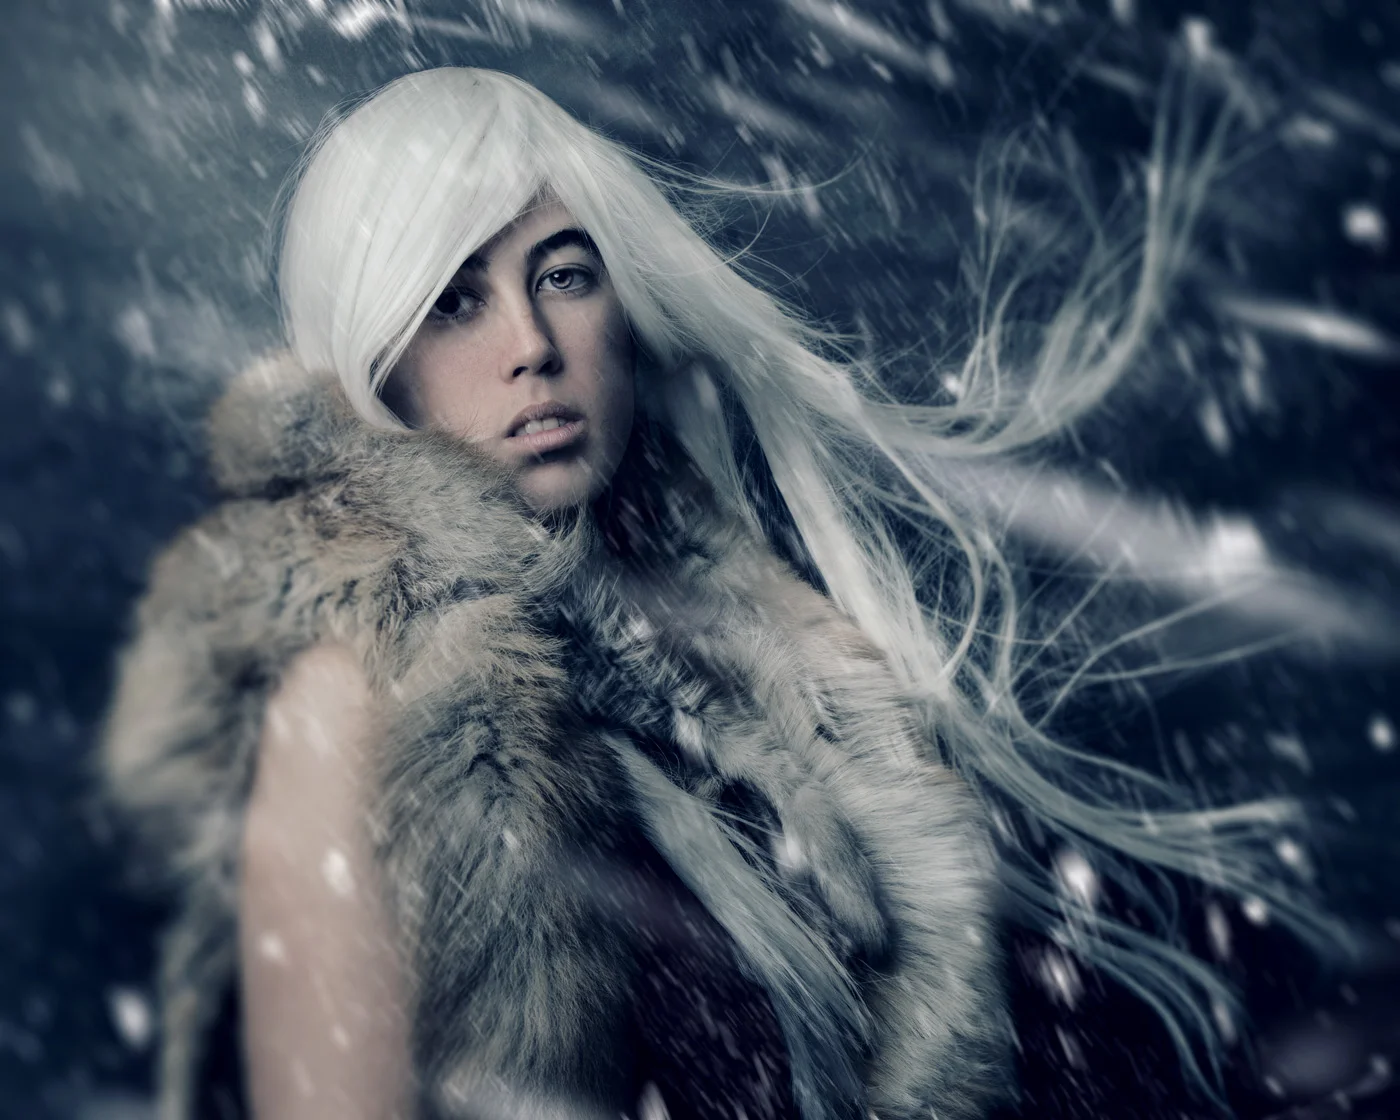
We did simple black and white portraits, the gold ones, and then since it was getting colder in December, I thought we'd do some more stylized ones. If you didn't know, I live in Santa Cruz, California. Right now as I type this in late January/Early February, it has been mostly clear skies in the upper 60s or low 70s for the last week. We don't really get a very cold traditional winter here. That said, I thought it would look cool if we all looked like we had been trekking out in the northern wilderness for a while so I set up some photos.
I originally wanted to go heavily viking inspired for these but the logistics of us all finding suitable costumes for it were a bit much so I settled on something easier: ambiguously draped furs. Finding the fur to use was easy thanks to my awesome friend Tracey who is a taxidermist and let me borrow some of the fur she has collected. You can find out more about her and her work at her blog: http://tmbtaxidermy.tumblr.com
As I mentioned above, I can't just walk out into the snow so everything but the people had to be comped into the photos. I have a resource folder of stock images of sky I have taken throughout the years and some snow resources I found which I used to make us look like we were actually outdoors:

Pretty much everyone in these photos came in their street clothes so they had to be taken off or hidden by layers of fur.
To get an idea of what the processing progression looked like, here is a gallery of some of the different stages from beginning to final image:
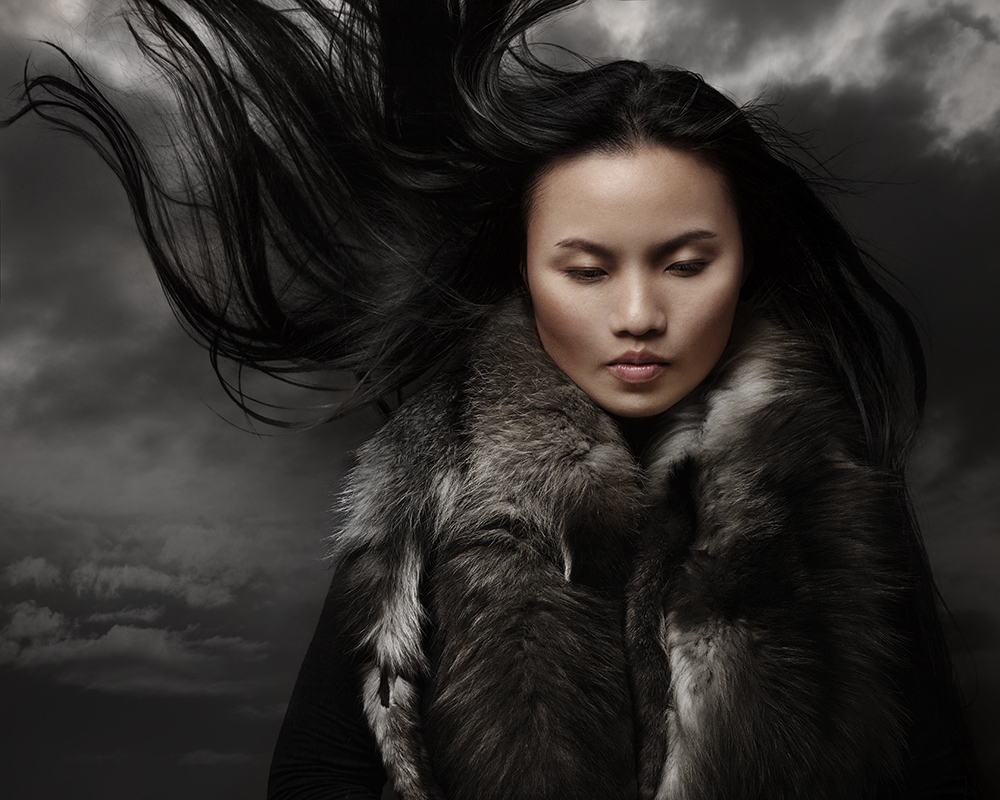
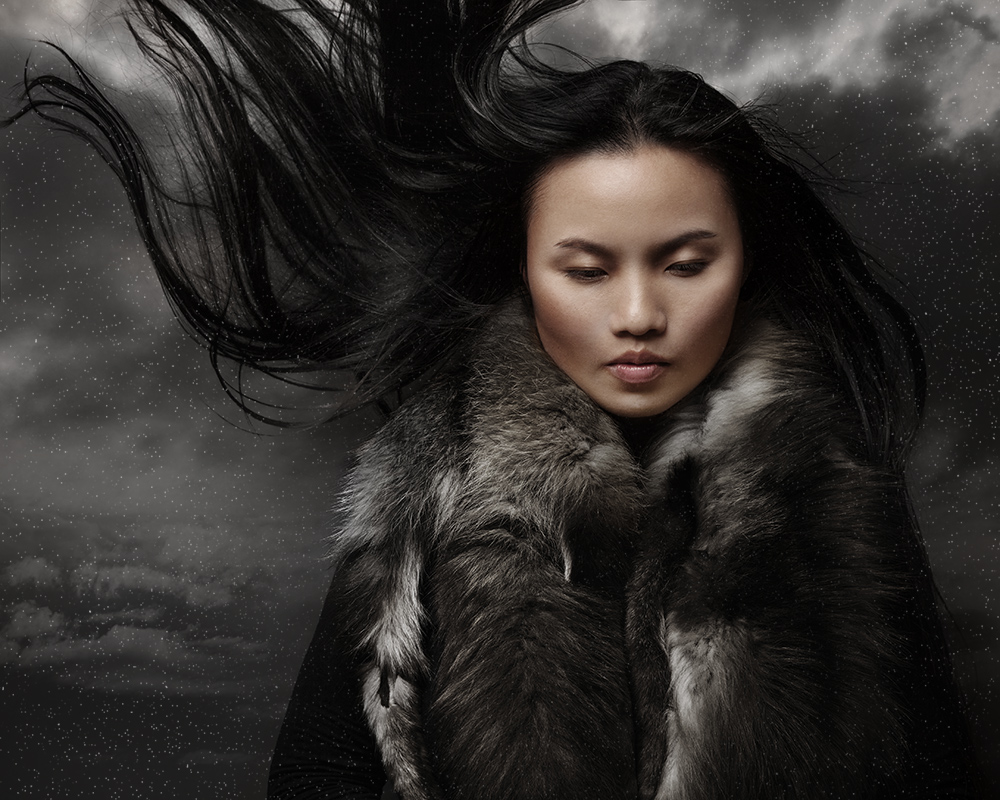
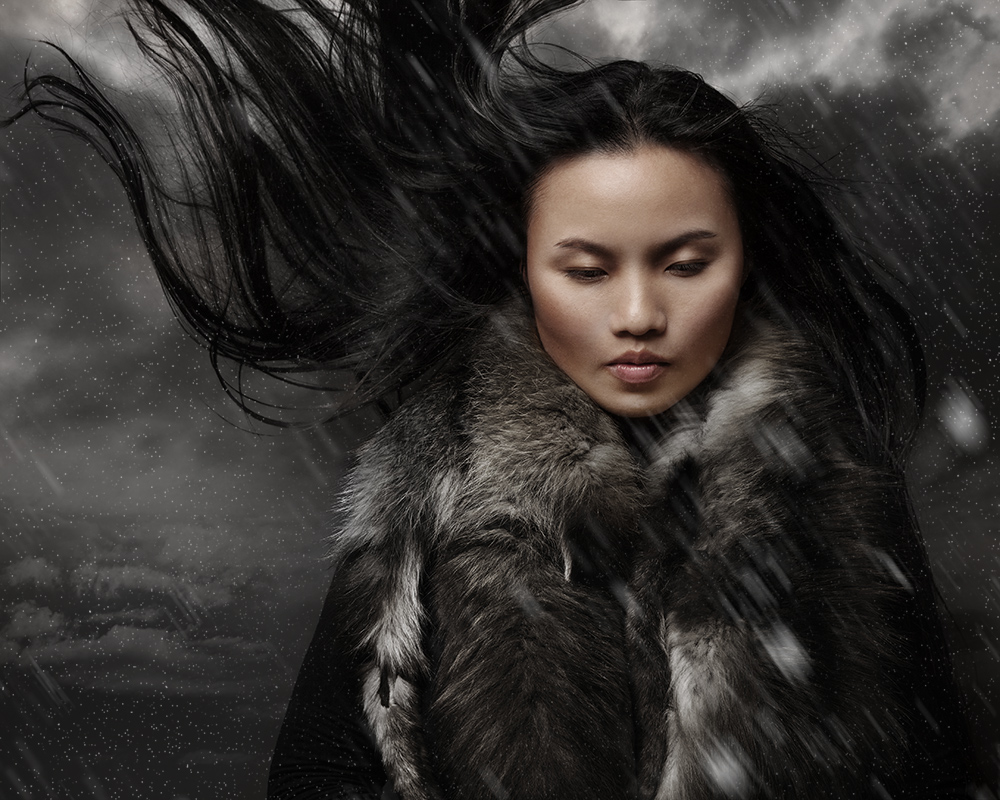
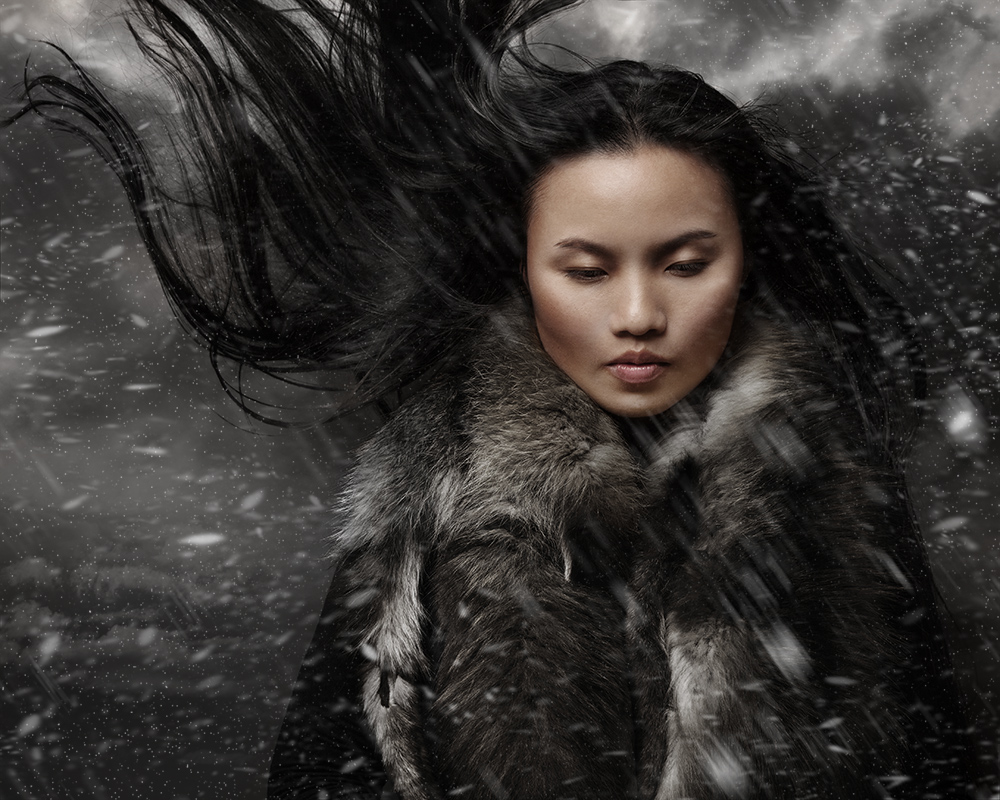
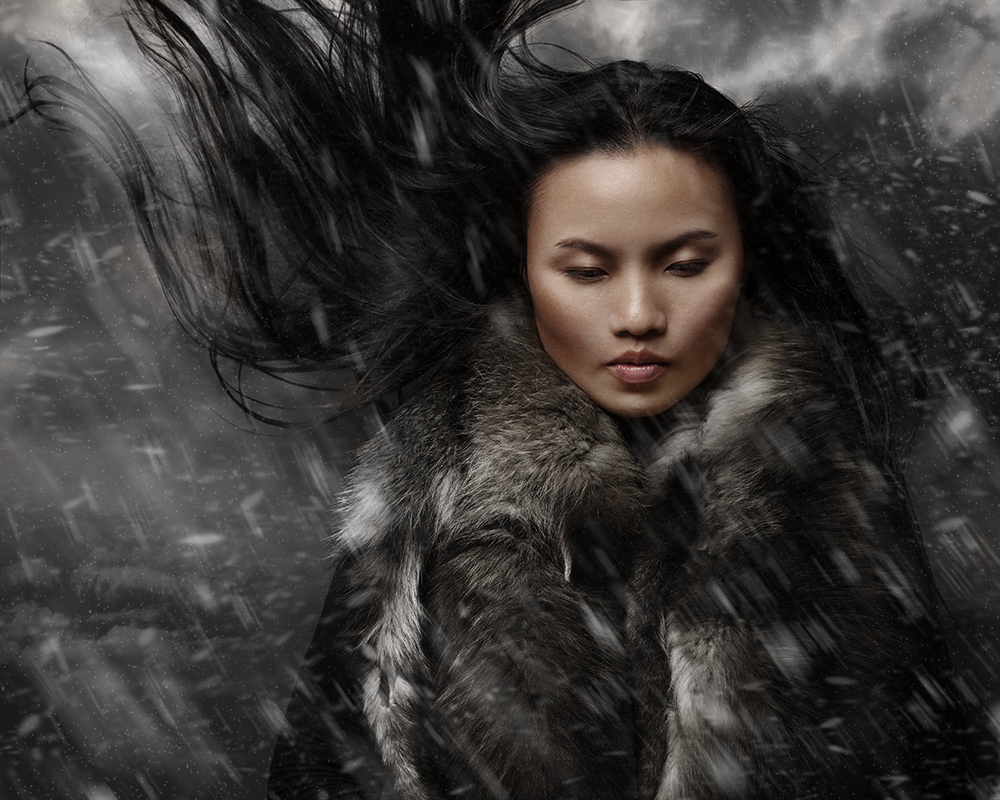

I realize that these don't look completely realistic. I would have liked to have gotten some actual fake snow and used it during the shoots to dust on the people and maybe throw past the camera but I couldn't get some by the time I wanted to do the shoots. Even if there isn't total realism, they pretty much achieve the dark and wintery look that I was going of so I'm pretty happy with these.
Here are all of the final shots:
One more thing, I finally uploaded something new to my Youtube Channel. A time lapse retouching video. I posted about it recently. Just thought I would add another little note on this post about my channel and mention that you can see a few of my photography related video there: https://www.youtube.com/user/nickchaophoto
Hopefully I can keep myself in gear and produce some more videos soon.
Speaking of Paintings

Last November, while working on a different project, my friend Paige and I set up a quick little portrait. She had the costume for a video we were doing and we thought it would be cool to use it for a photo as well. It was fun to work with a dark room, candle, and the modeling light from one of my strobes turned down to a glow.
Here is a before/after of the image:
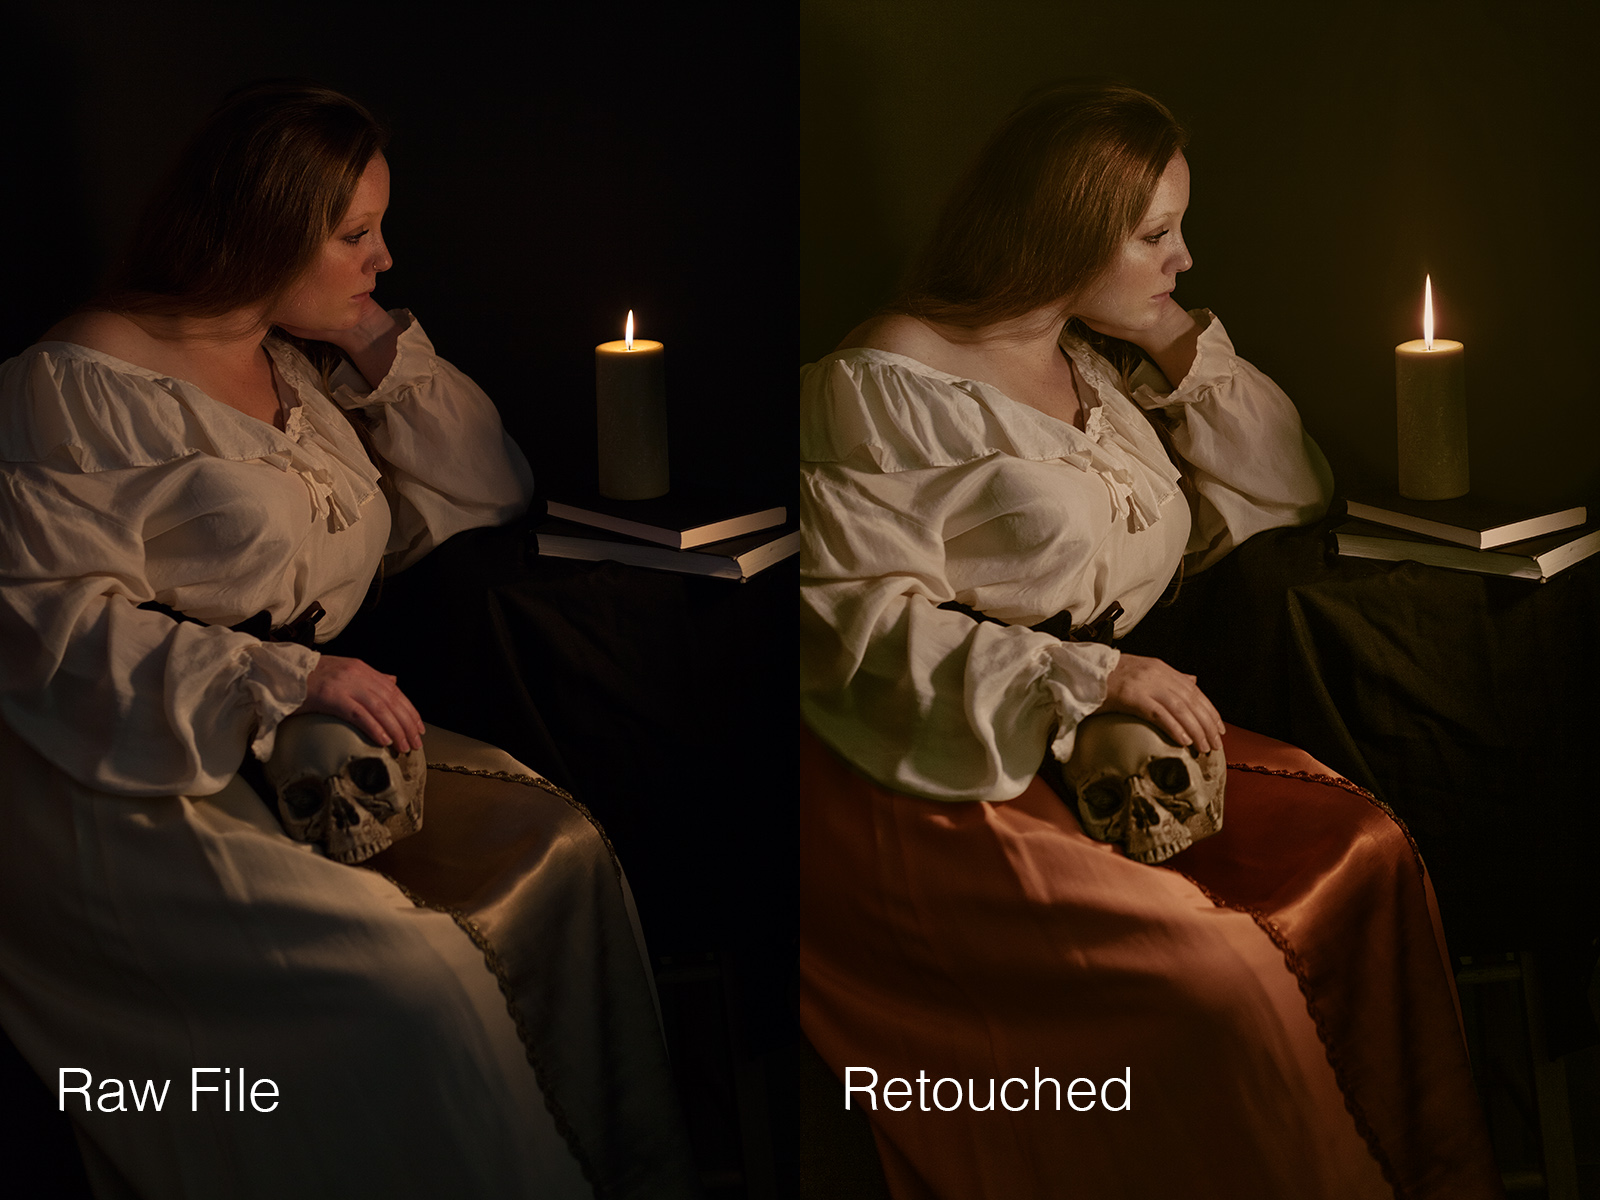
Looking at them side by side now, it seems like the biggest changes were really just the contrast and the color of her skirt. The color was changed to more closely resemble the original painting we were emulating and to provide some color contrast between her and the soft green tones I was going to add to the shadows.
Here is the Georges De La Tour painting, The Penitent Magdalene, that inspired us:

First saw The Penitent Magdalene in an art history class and then I saw a very similar work by La Tour at the Met in New York. Love how the candle light in the painting rakes across her body. Its warm, intimate, and kind of disquieting.
Obviously not an exact duplication due to some color and posing differences, we just wanted to do something that was very similar since we really like the original painting. I think I originally added some red to the shadows of the photo but the greens/yellows end up looking a little dirtier and provide for some more color contrast between the green shadows and the oranges.
I'd love to do some more photos inspired by old paintings. On my list of things to shoot..
A Few Portraits and Some Musings on Studio Light

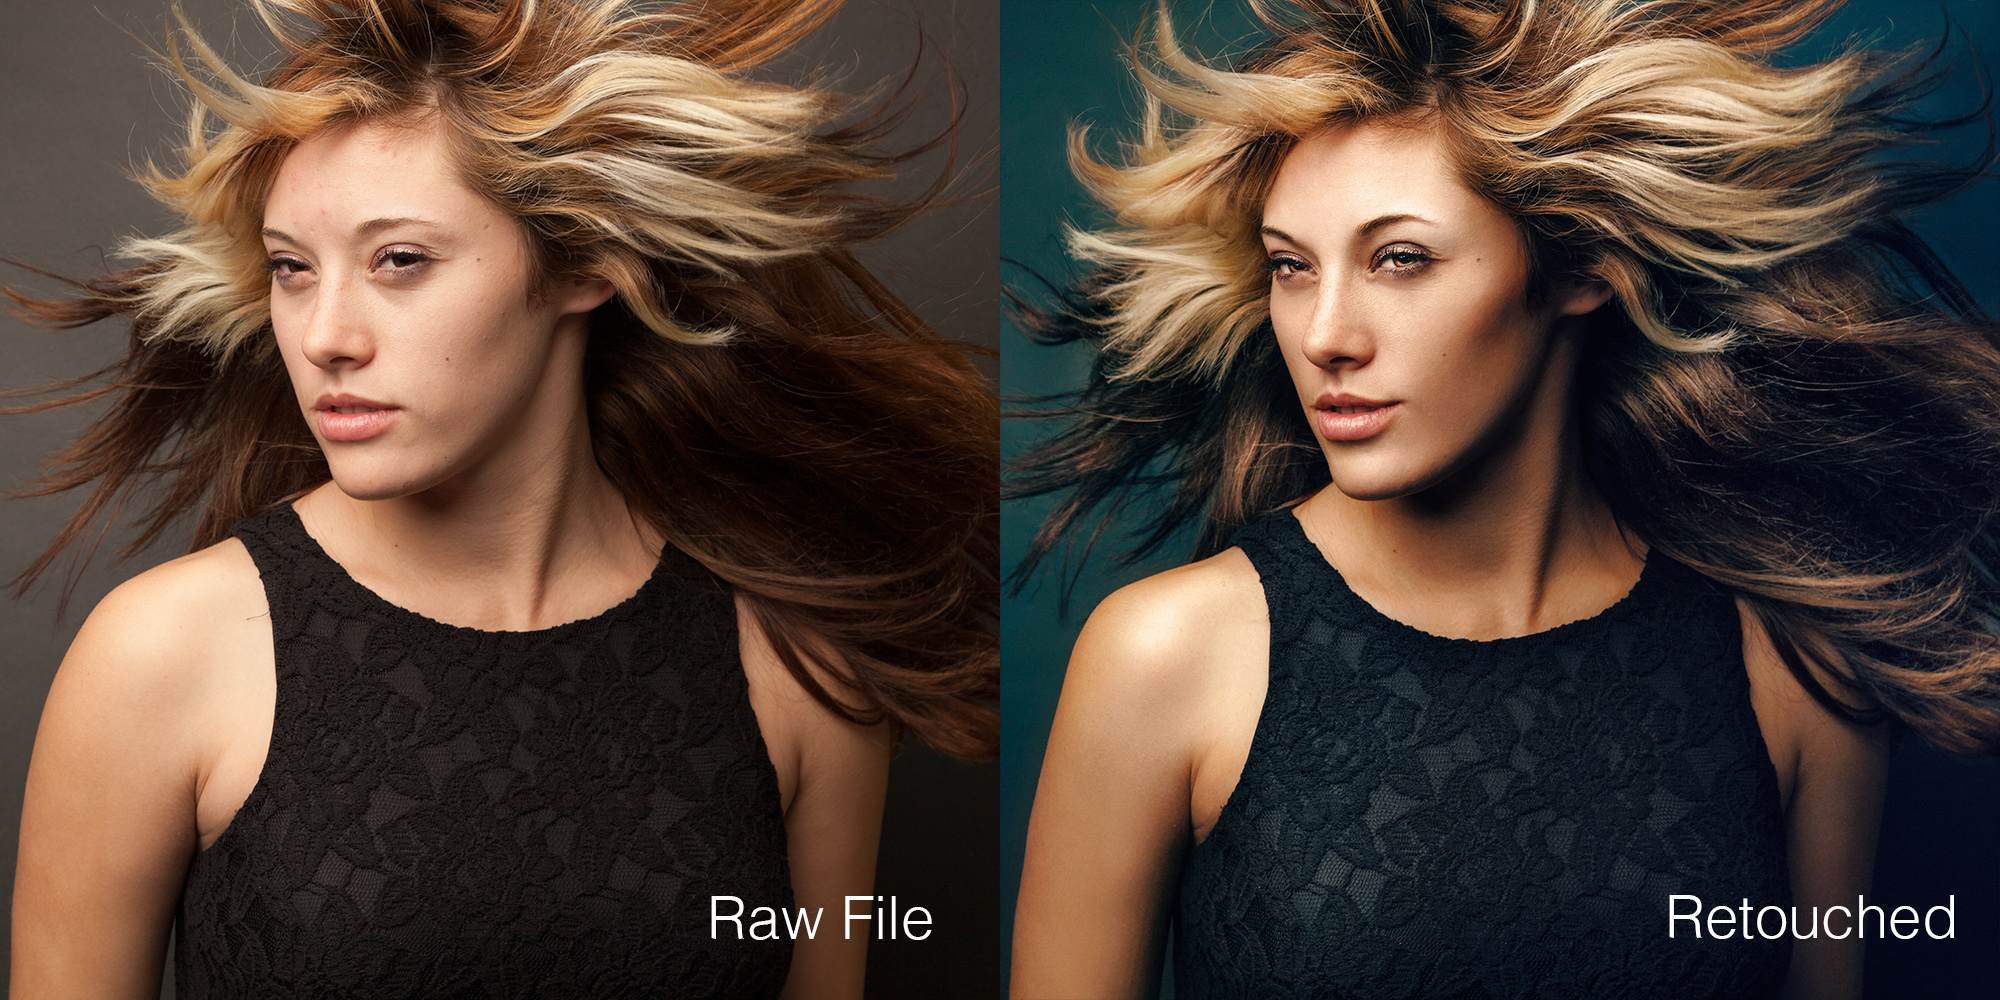
Although these photos aren't particularly elaborate, I thought I would write up a little post about some portraits I did of a friend back in October.
I met and started hanging out with a few new people last year and as usually results from my acquaintance, we ended up taking some photos. Renee, in these photos, didn't have anything particular in mind and while her and some other friends were over to hang out one day, we took a few photos.
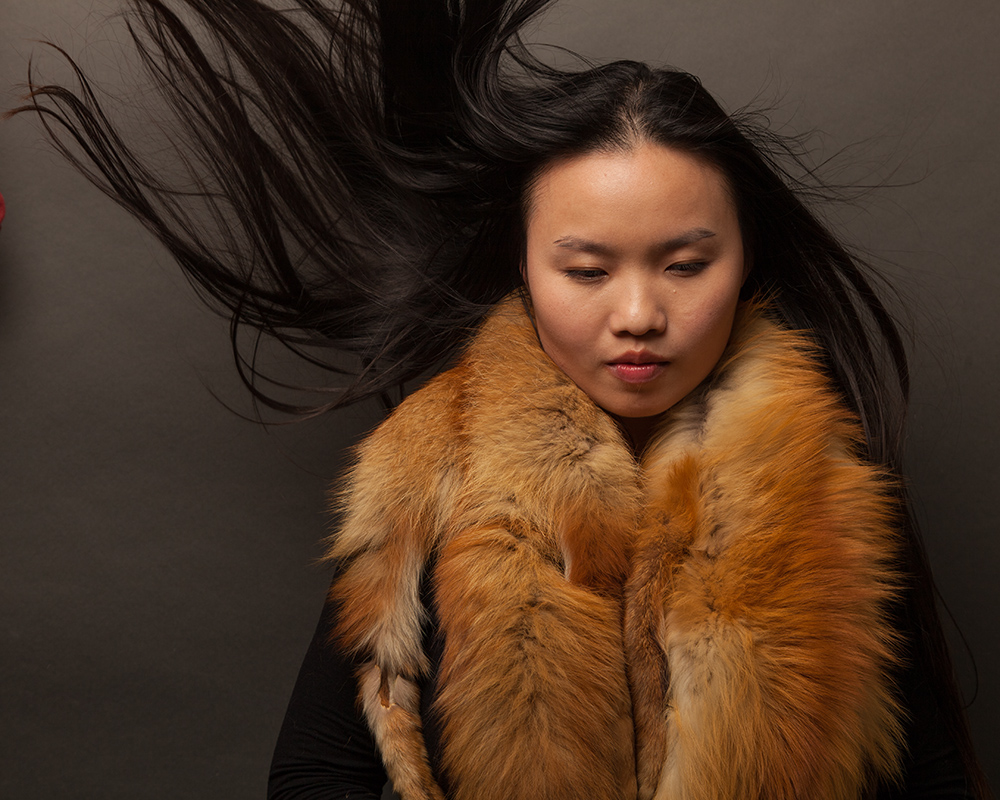
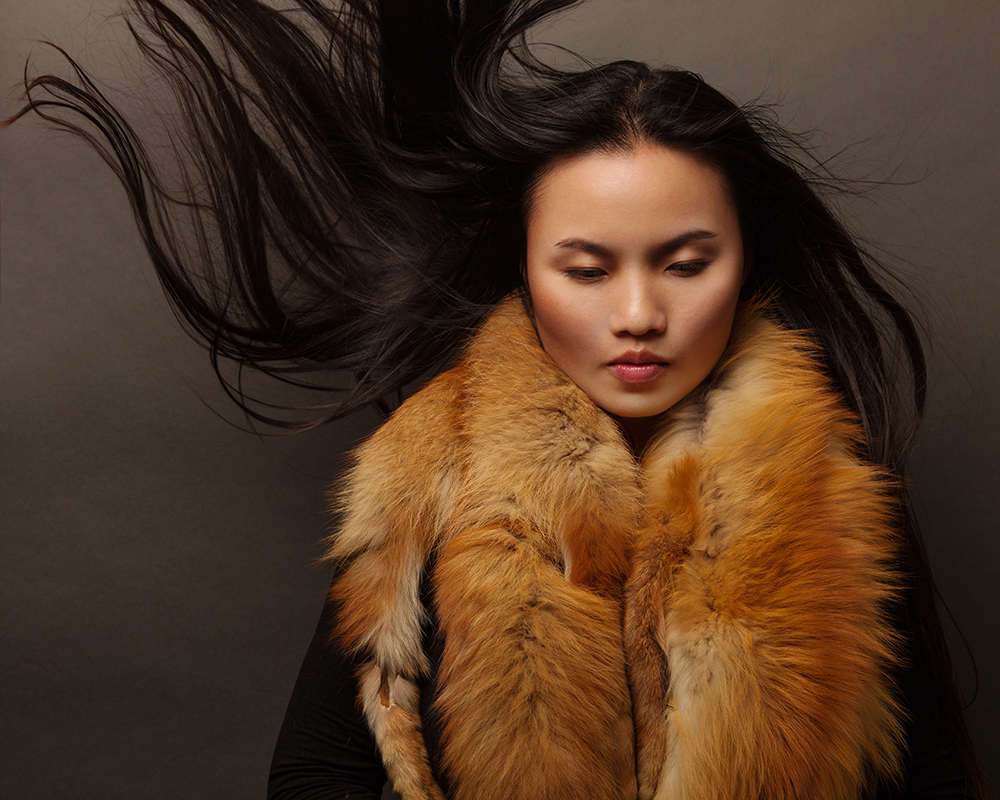
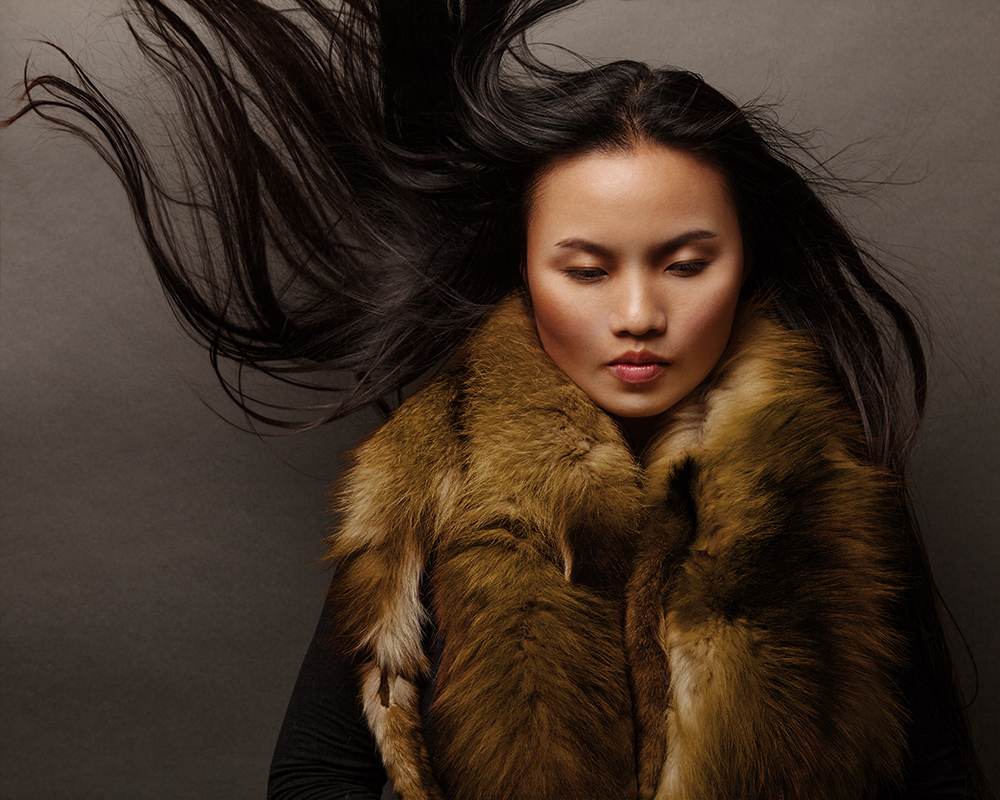
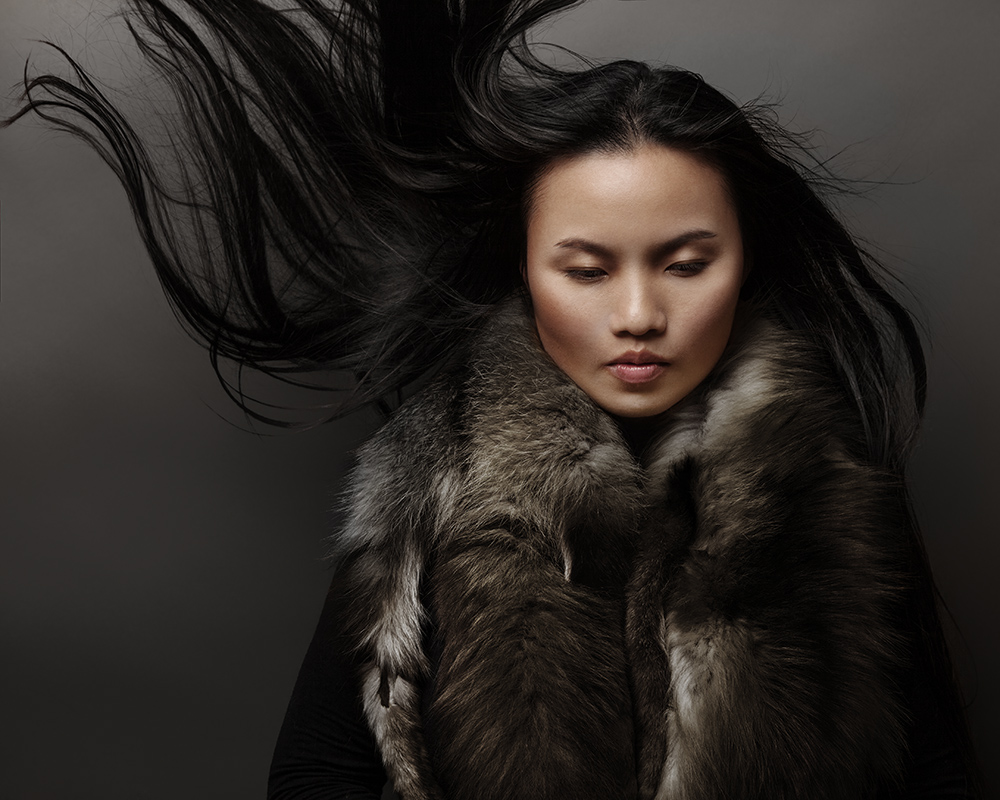
I suppose it is kind of contrived to rely on wind whipping up long hair to add interest but it has pretty much become one of my go-to crutches when I want to add some interest to a shot without doing anything too crazy. These kind of remind me of 70s/80s glamour shots. Kind of over the top but (I'd like to think) in a good way.
I can't remember what I was doing with the light setup but I'm 80% sure it was my usual 60" softbox-umbrella or possibly a smaller 36" white umbrella. Simple light and my plain dark grey background can help create portraits that are modern and keep the focus on the subject. I have read a fair deal about various portrait lighting techniques and setups but I usually go back to just using one well placed key light and evening out the tones in Photoshop.
Fill light can be useful of course, and I rely on that a great deal more when I am shooting in a studio for a fashion or product shoot. In those cases, clearly representing the product is necessary so I often use more even light.
I go back and fourth on using a rim or hair light. I feel like always using a hair light can make portraiture look rather pedestrian and formulaic. It dates it, not necessarily in time, but in a photographers style. At least to me, it can say "I'm learning how to take portraits and I read that a hair light is necessary for separation so I'm using it". Aesthetically, there isn't necessarily anything wrong with it, I just think that it isn't always a necessary element of a successful lighting setup.
I think some of the reasons that I tend to use light the way I do are my influences. I find that the techniques used in fashion photography translate well to most portrait situations. Usually a soft light, positioned high and often to one side of the subject provides a flattering and interesting look. I'm also a big fan of renaissance, baroque, and rococo portraiture. You don't often see many obvious light sources in a renaissance portrait so much as a perfectly placed soft light source. Light so soft it appears to create it's own fill. Some of my favorites of my own photos are the ones where the light has a beautiful, soft, painterly quality.
Some day I would love to set up interesting scenes, perhaps from mythological tales, and light them with massive scrims and soft boxes to get that perfectly soft renaissance light. Putting aside the times when I'm purposely going for a modern or different look, I generally like to try and recreate the look of natural light. Even if that means something ends up looking decidedly unnatural which is sometimes the case when I shoot in full sun but light the subject with a big softbox or umbrella. You can tell the light was hard/directional in a certain way but the subject is lit by what looks like the light from a perfectly cloudy day. Overcast light is beautiful.
Anyway, back to the portraits that I originally intended this to be about before my distraction into light. If you made it this far, thanks for reading and here are some before/after retouching examples of the photos of Renee:

Video: Retouching Time Lapse
Here is a simple new video I've recorded that showroom basic portrait retouching. Essentially just a recording of my screen while I work in Photoshop played back at 500% speed, you can get an idea of what it looks like when I'm retouching skin and color.
I'm still sorting what kinds of things I want to do detailed tutorials on but I thought it might be cool to see something like this.
As I note in the description on Youtube, the "final" image isn't really done but it is probably 85 or 90% done. I'd probably do a bit more detail work and of course some sharpening.
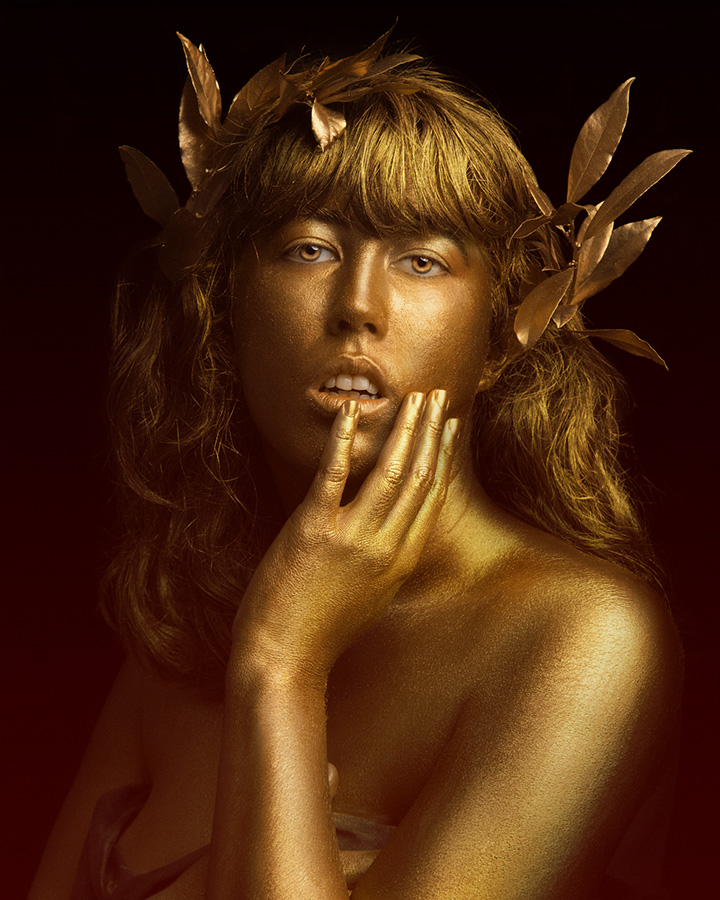
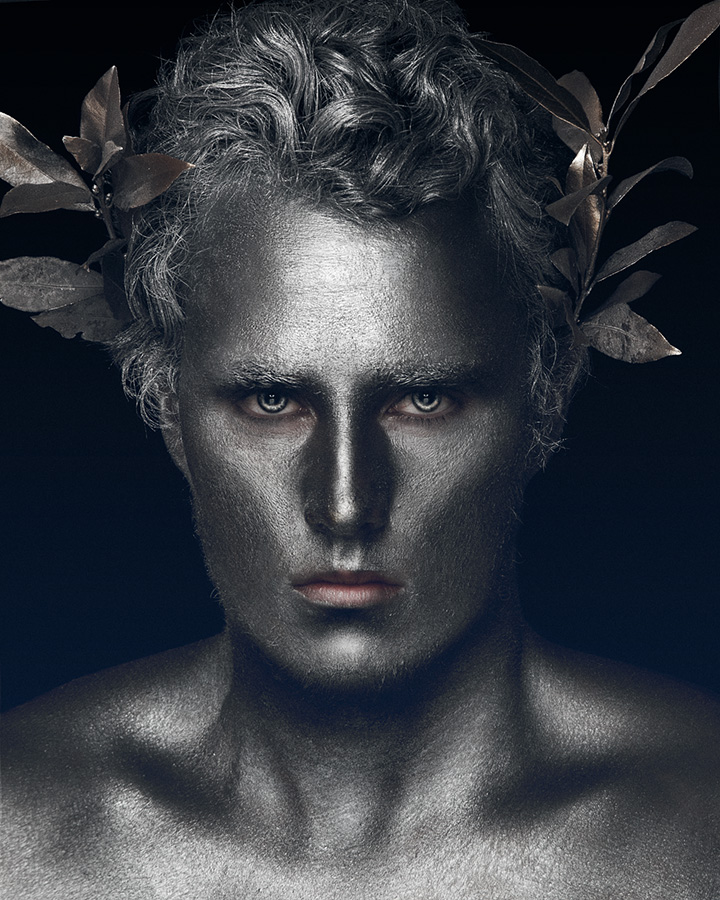
Gold Series (So Far)

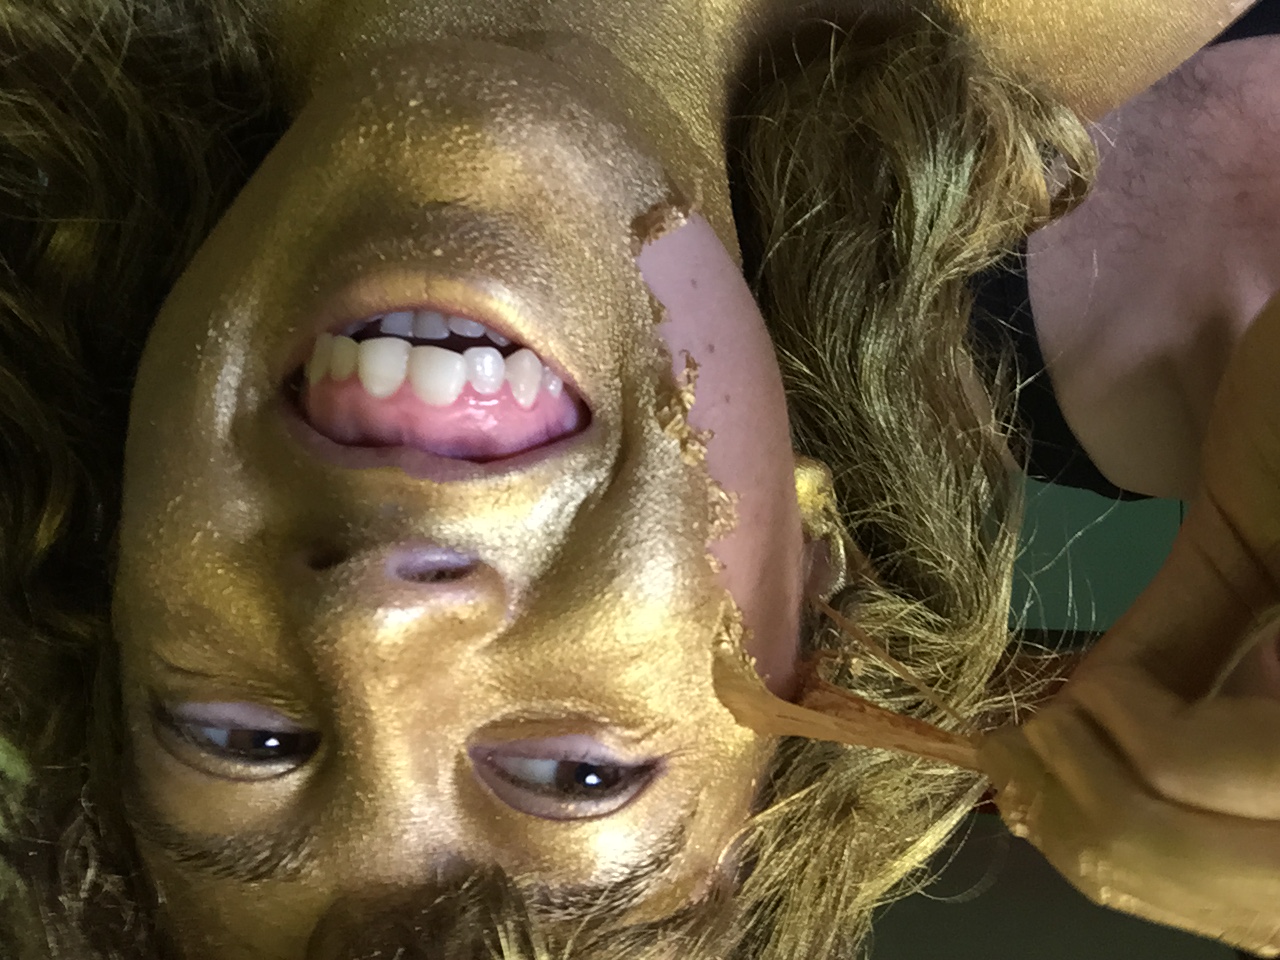
For a while I had been wanting to try doing some photos of people painted gold or silver with metallic paint so I got some supplies together and started experimenting. My original concept involved a little more of a set made up with a large gold picture frame and even more gold flowers but I didn't get that together by the time I wanted to start shooting these so I settled with something more simple. I might revisit the original idea another time.
People always ask about these photos and how I got the people gold. Whether it was all Photoshop work or something else. Yes, indeed, they were all actually painted with various paints. The first handful of these were done by using gold/silver acrylic paint. I know, I know, it probably isn't the healthiest option but I've used acrylics before in paint shoots and I had some gold left over so it was the first thing I tried. Again I did the photo of myself first to test how it would look and I ended up pretty pleased with the result. After letting some friends know that I did it with acrylic, they still wanted to have shoots so we forged on.
The setup for these was again, very simple. I actually don't remember if the light was consistent through all of them. It was either a 32" or 60" umbrella. I tried both on myself the first time and I think I ended up preferring the softer light of the bigger one so it was probably that. Background was my trusty roll of grey paper. When I look at them all next to each other like they are at the top of this post, I see now that there isn't too much consistency between them in terms of the retouching. Mostly the ones of myself and Marina are different than the others. Still though, they are similar enough where I would consider them all a part of the same series.
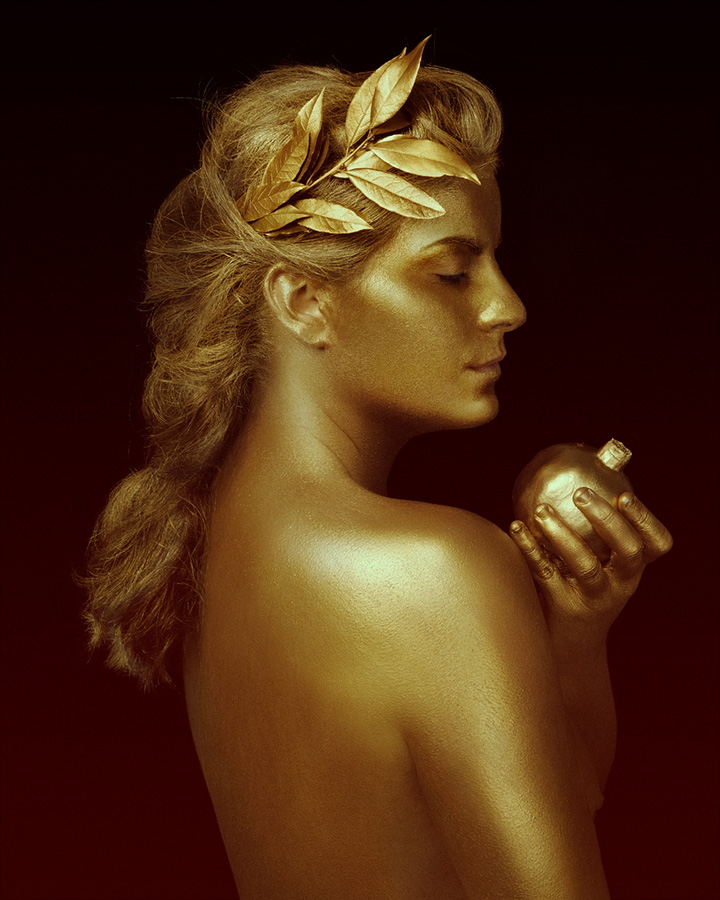
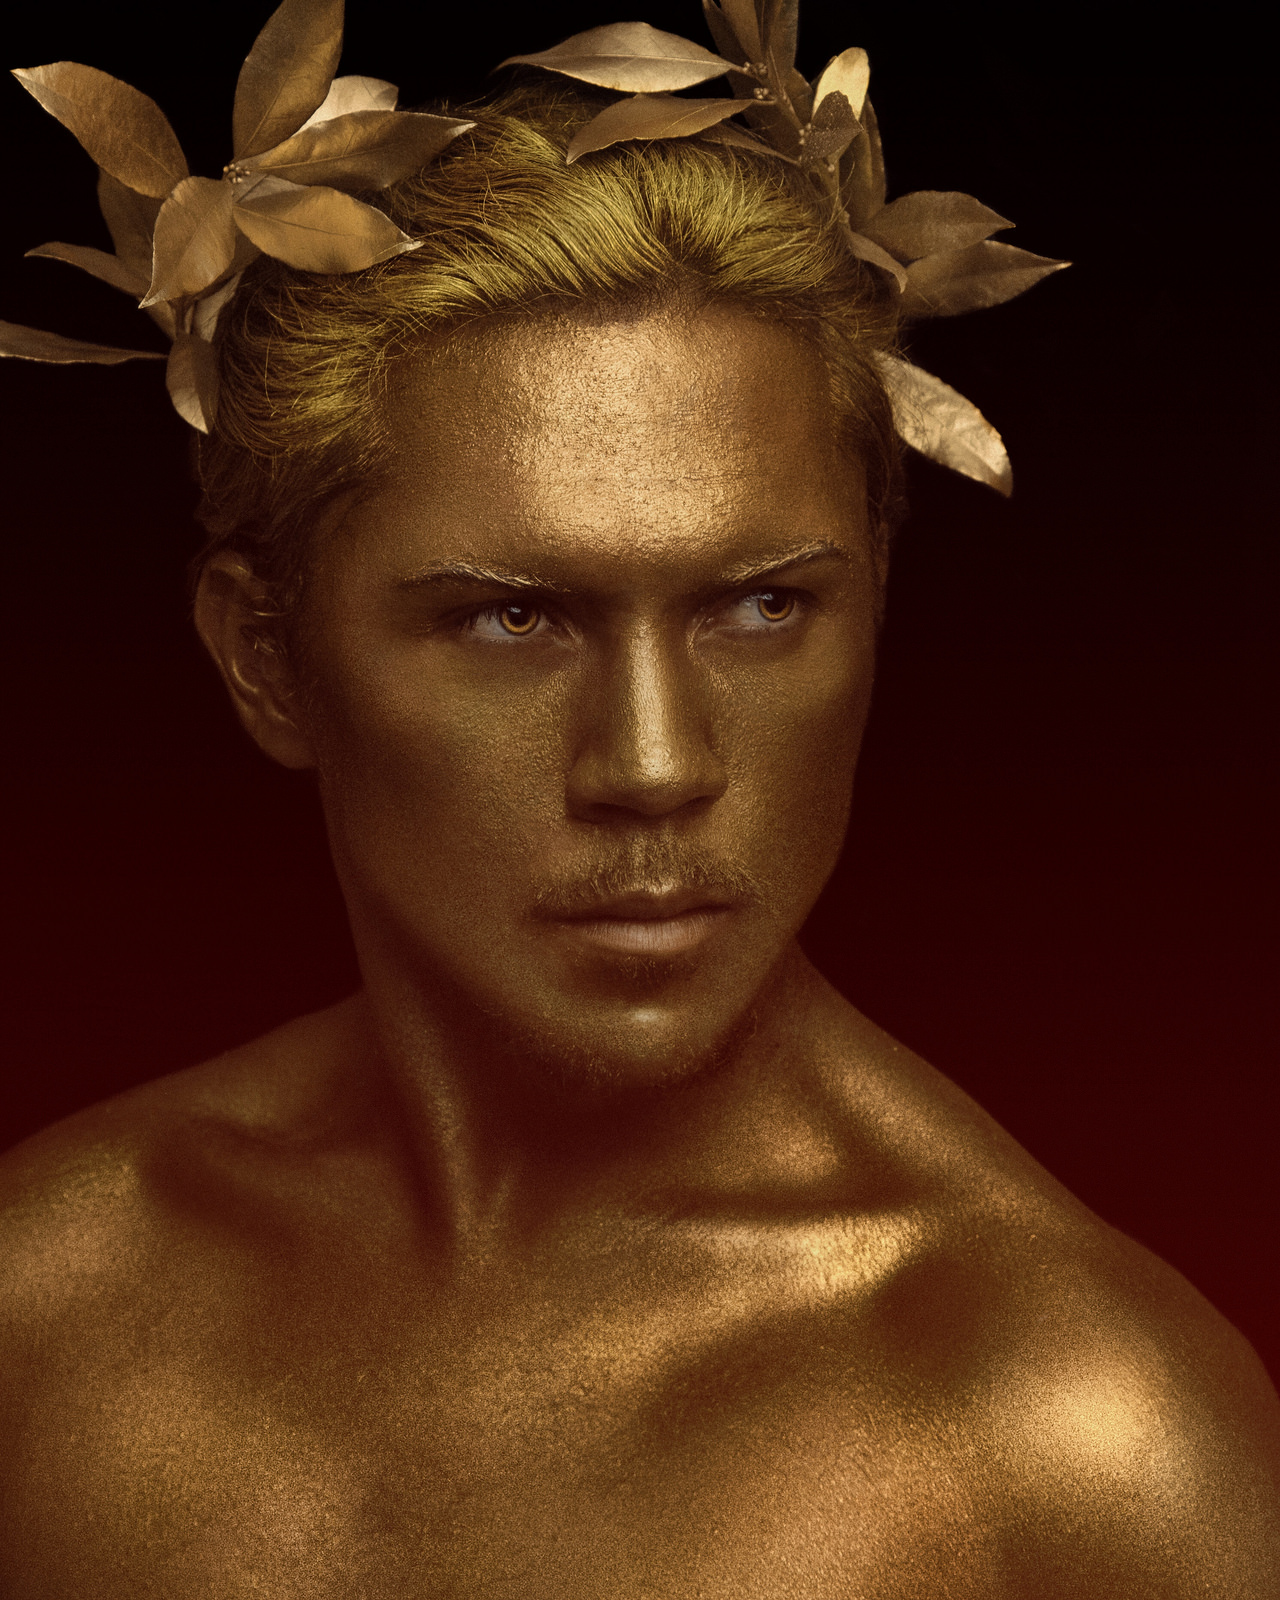
There was a good amount of retouching done on these. I wanted them to look like statues so the skin and painting had to be smoothed out a lot and many wrinkles (in the photos with fabric) were smoothed out. I also added a subtle red or blue fade from the bottom of the photos to give them a bit more color. Here are some before/after pairs:


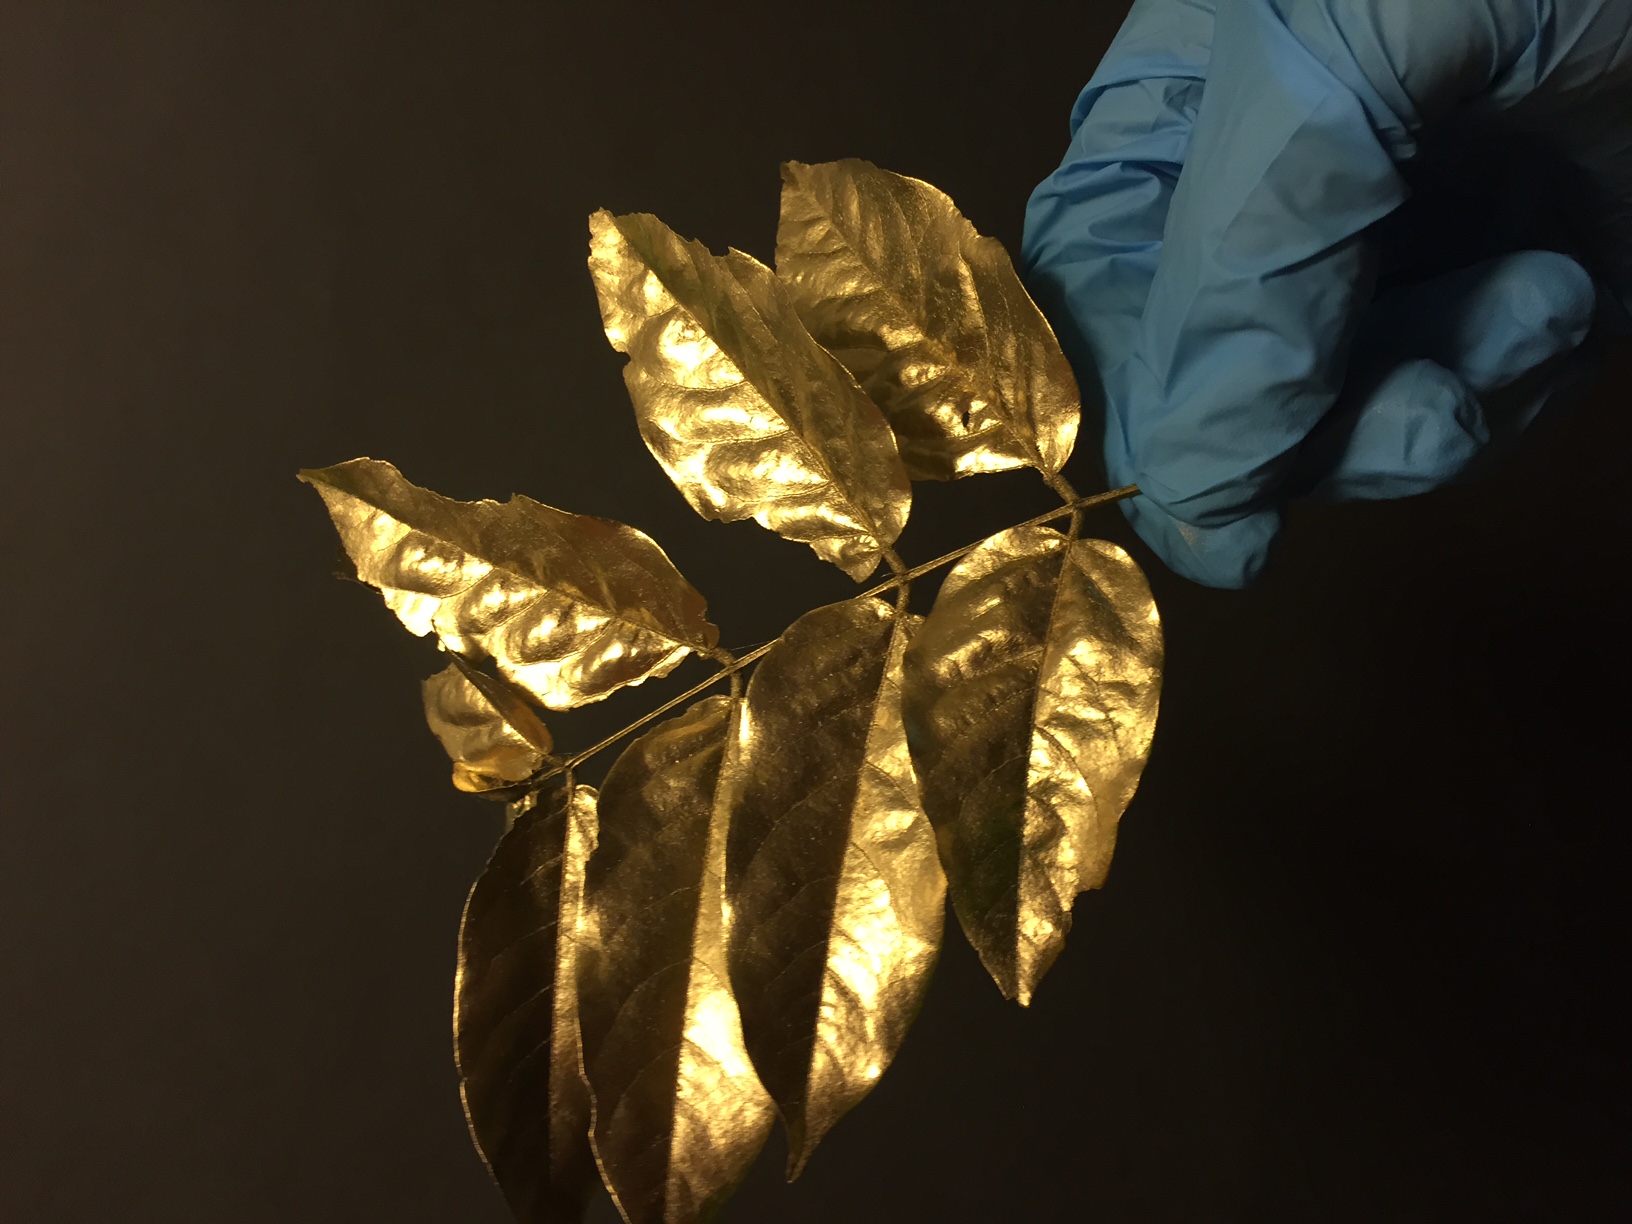
When I was first testing out the gold stuff on myself, I spray painted some bay leaves to use in the photo. It ended up looking kind of classical and greek (even if it was gold and not stone) so I thought it would be cool to do all of the other ones as loose depictions of Greek gods. That turned out being too much to do in the timeframe of the shoots (I needed new work for a local art show event so I needed these done quickly) but again, its something I wouldn't mind revisiting in the future.
Here are a few other behind the scenes photos of the shoots and supplies:


And here are some of the final images:


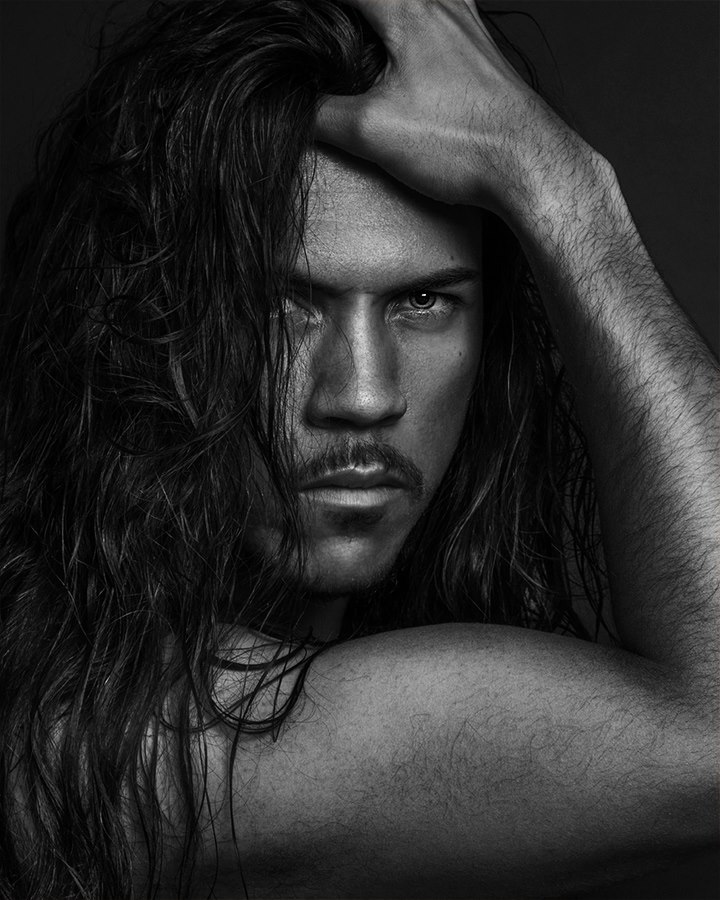
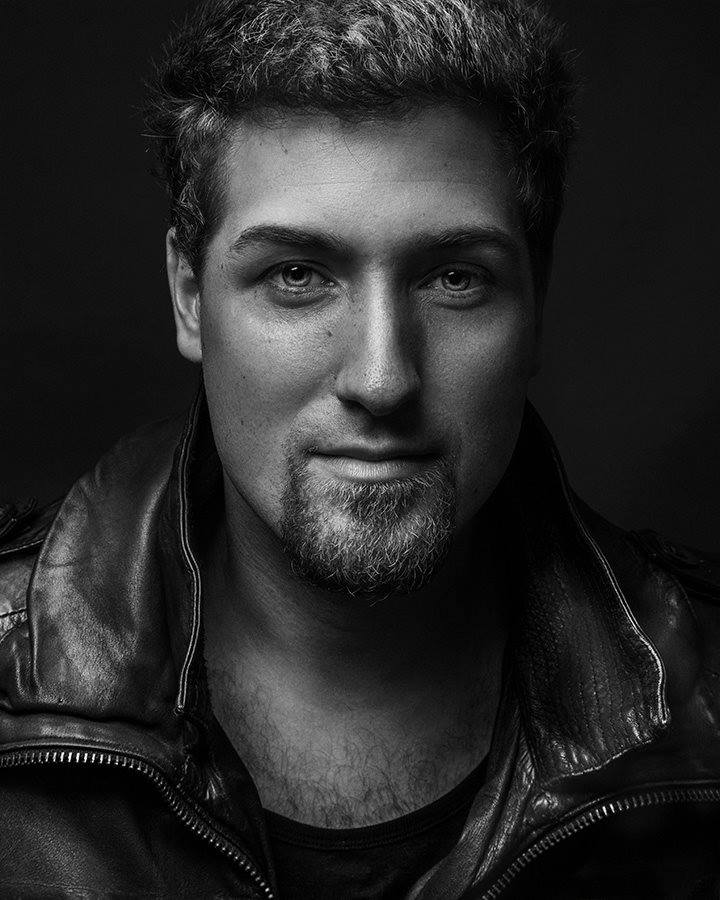
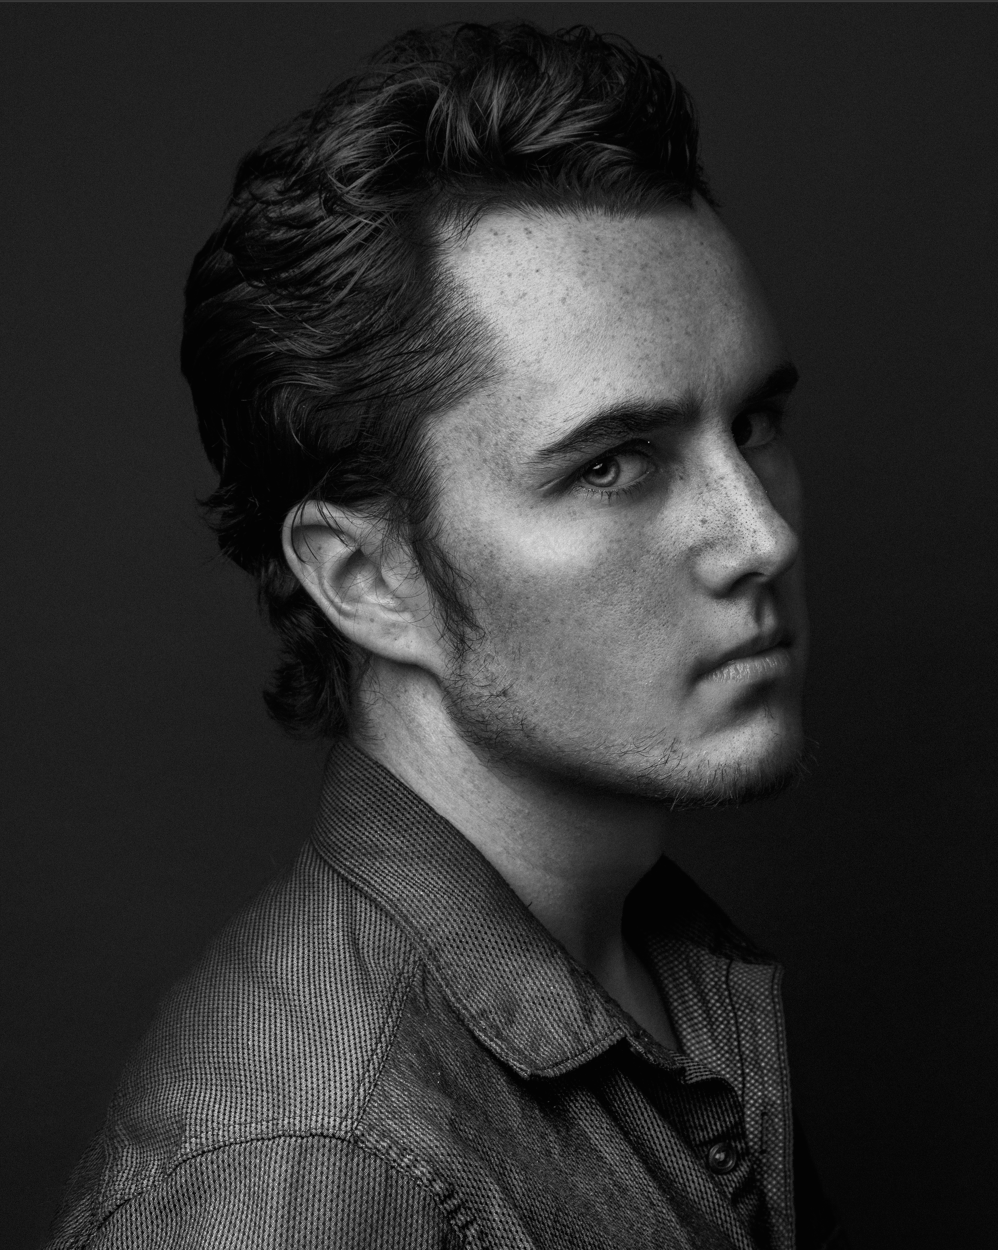
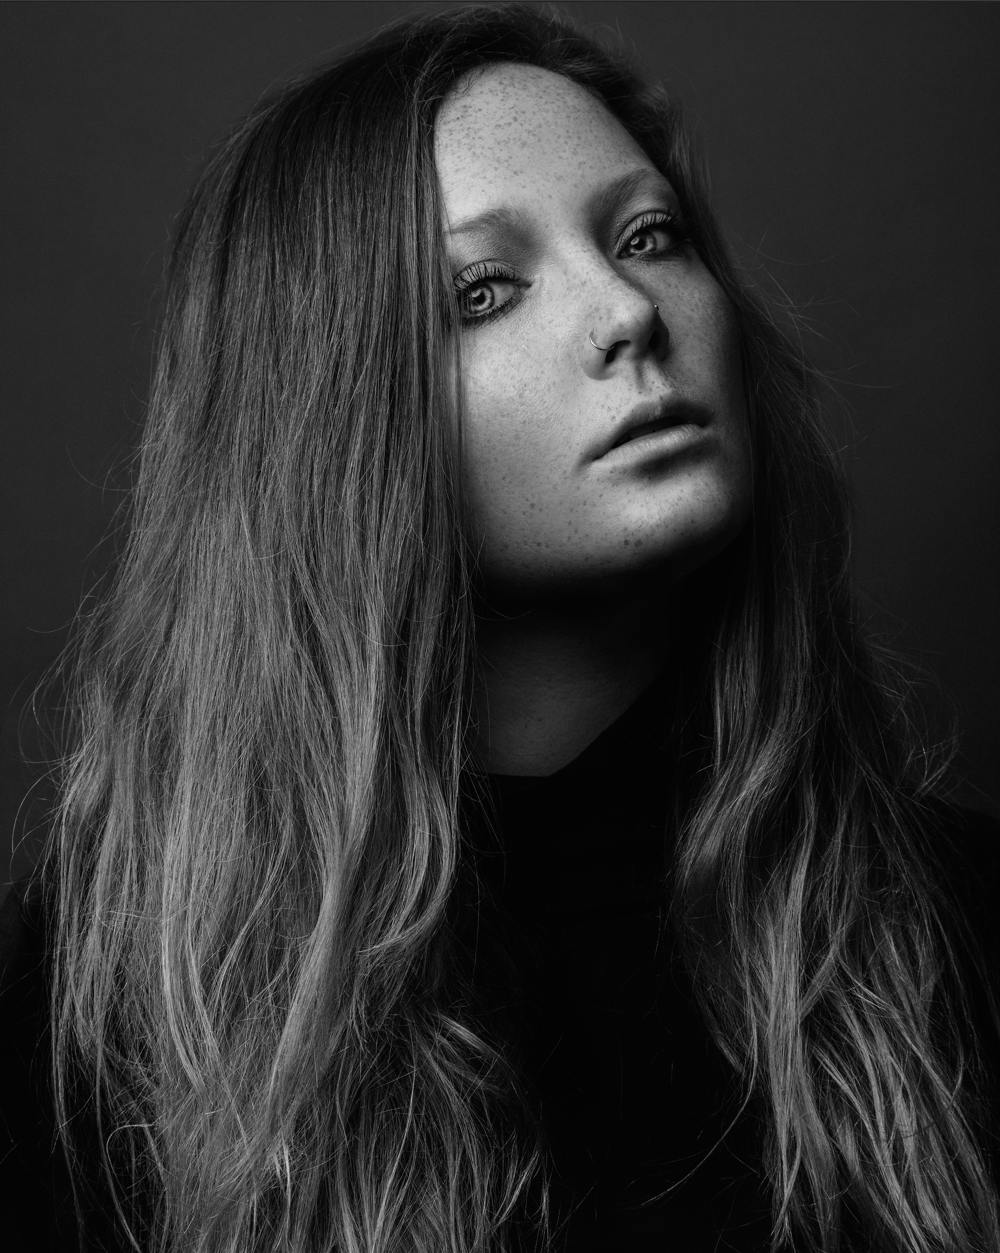
Black and White Portraits

Recently I did a little series of simple black and white headshot portraits of myself and some friends. I wasn't giving them too much thought at the time but looking at them now I really enjoyed being able to do something simple. Usually I've been trying to make my personal shoots more and more stylized and produced but these were literally just one light with a small umbrella, a grey paper background, and the people in front of the camera.
The first photo I did was the one of myself in the middle of that face compilation at the top of this post. I haven't done many photos in black in white recently so I thought I would practice on myself. I ended up liking the style with that kind of light and high contrast retouching so I tried to keep it relatively consistent with the rest of them.
In the photos below you can see some examples of the photos before and after retouching:

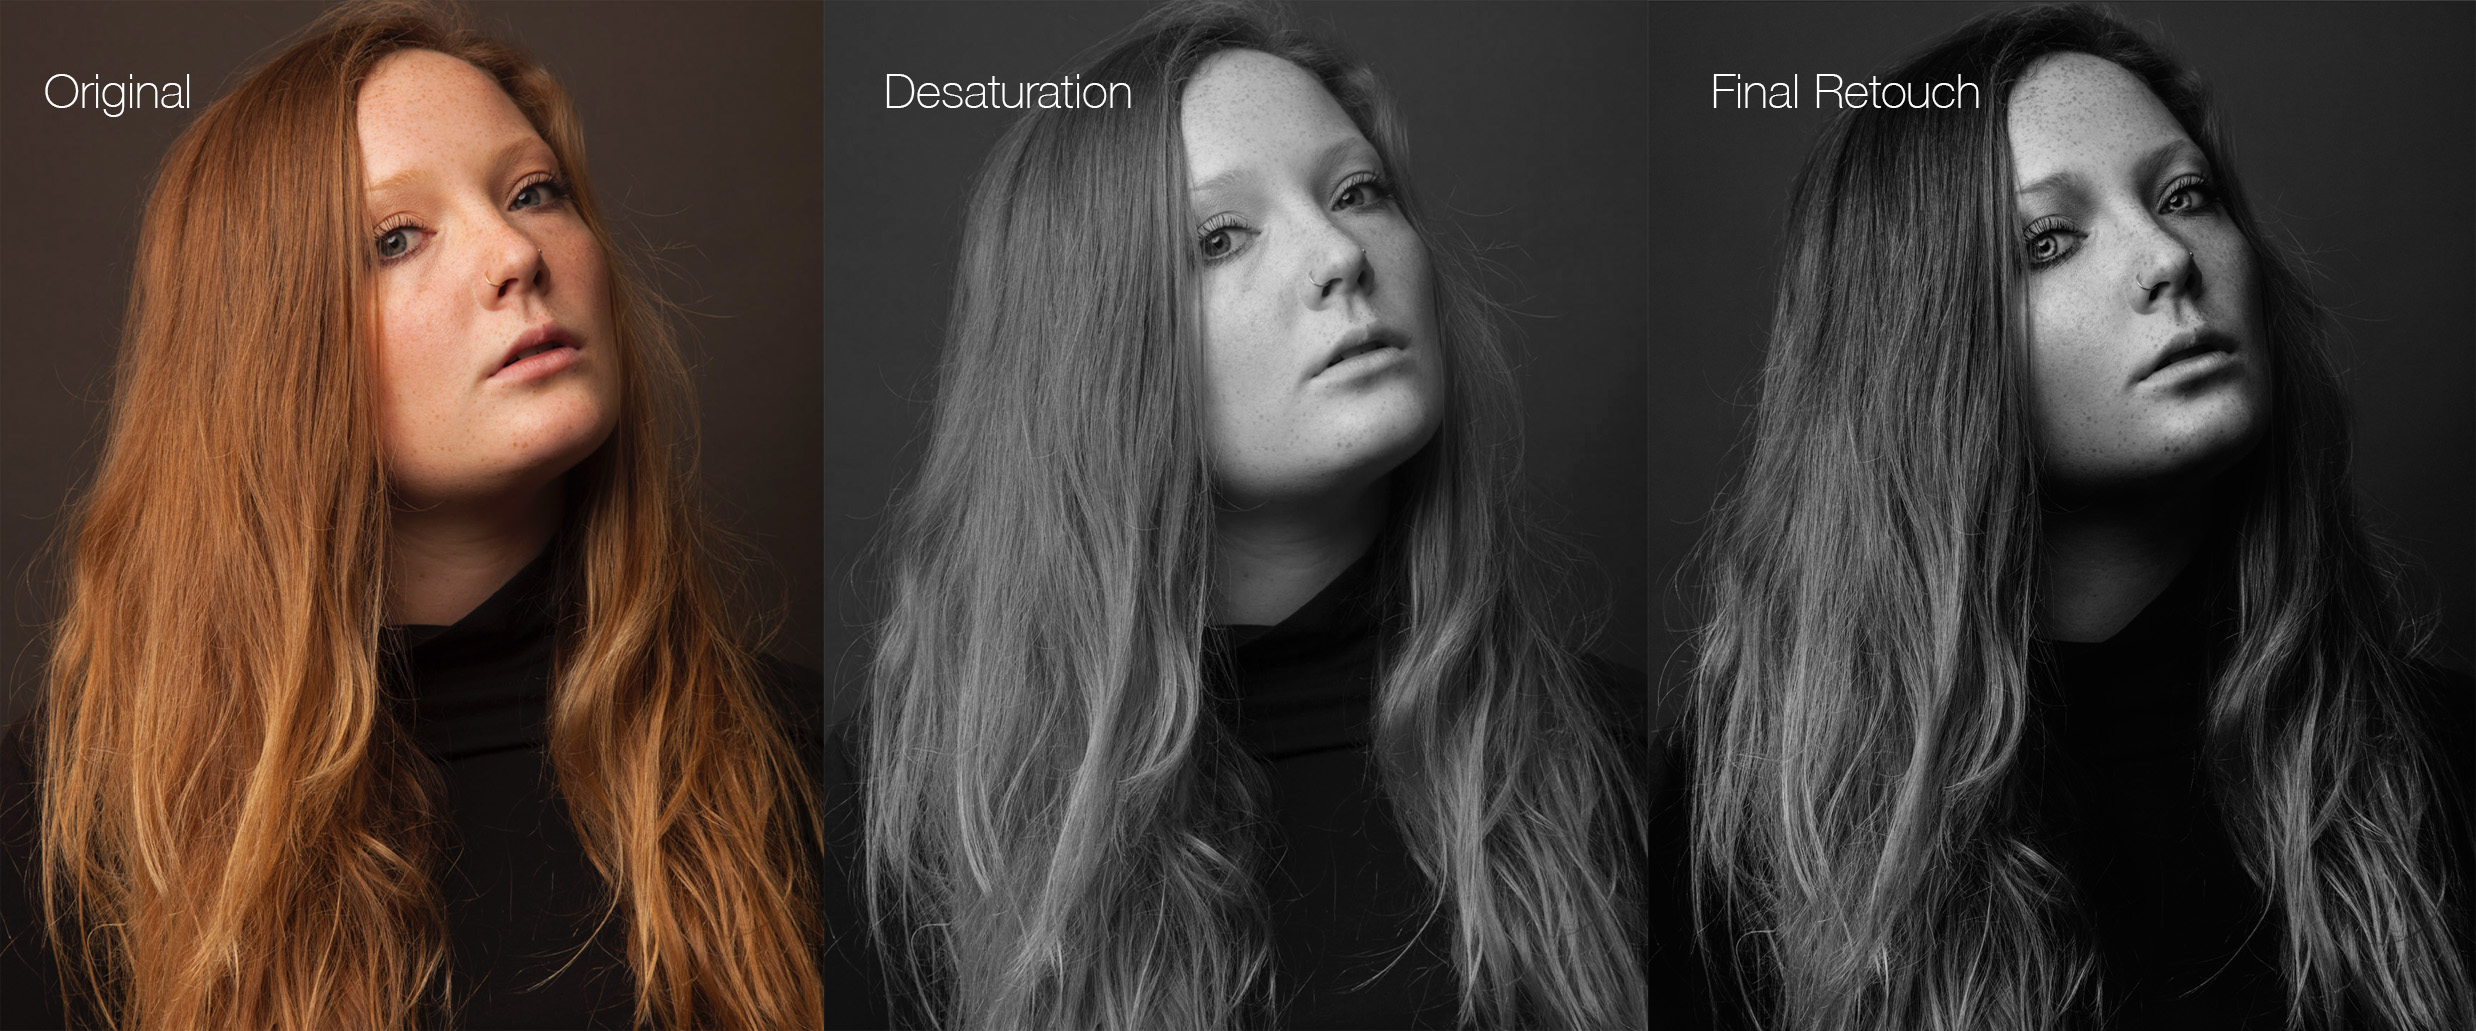
As you can see, there is a pretty dramatic difference between the original photos simply desaturated and the final images that I detail retouch. Soft black and white photos like the plain desaturated ones don't really work for me. Usually if the photo is going to be black and white I also make it pretty high contrast with exaggerated shadows and highlights. I feel that it keeps the photos interesting and makes them more graphic. Since I usually use soft light, I always shoot with the intention to play a lot with the contrast in post to make sure the photos don't look washed out.
One of the things I like about them the most is that they are actually kind of personally significant since these people are all good friends of mine. I guess my personal work isn't usually this personal. On top of that, some of these people hadn't really let me take their photo before so that was fun. Technically I didn't take every photo. One or two were actually taken by my friend Alison after I had set everything up. I still mostly consider these my photos since I did all the retouching and set up but credit where credit is due, the photos of Sarah and I think Monica were shot by Alison.
I'd love to do some more of these kinds of photos with a bigger studio space. It would be fun to take the same concept but photograph the people from farther away to play with posing. It would be great like to get a client that wants these kinds of portraits some day so I can explore it further but of course until then I'll probably keep doing them as personal work now and again.
Here are most of the finished portraits. I'm writing this on my laptop on which I don't have all of them saved so a few are missing:


Ritual
Above: Final image from the shoot. I always love the way light interacts with smoke.
Its funny, I feel like every year or two I buy a cheap little fog machine to use for shoots, use it once, and then it breaks and I end up getting another one later on. I hadn't had a working one for a while so I finally ordered another and was on my way to some cool new photos.
Above: Another final image with cooler colors and emphasized fog.
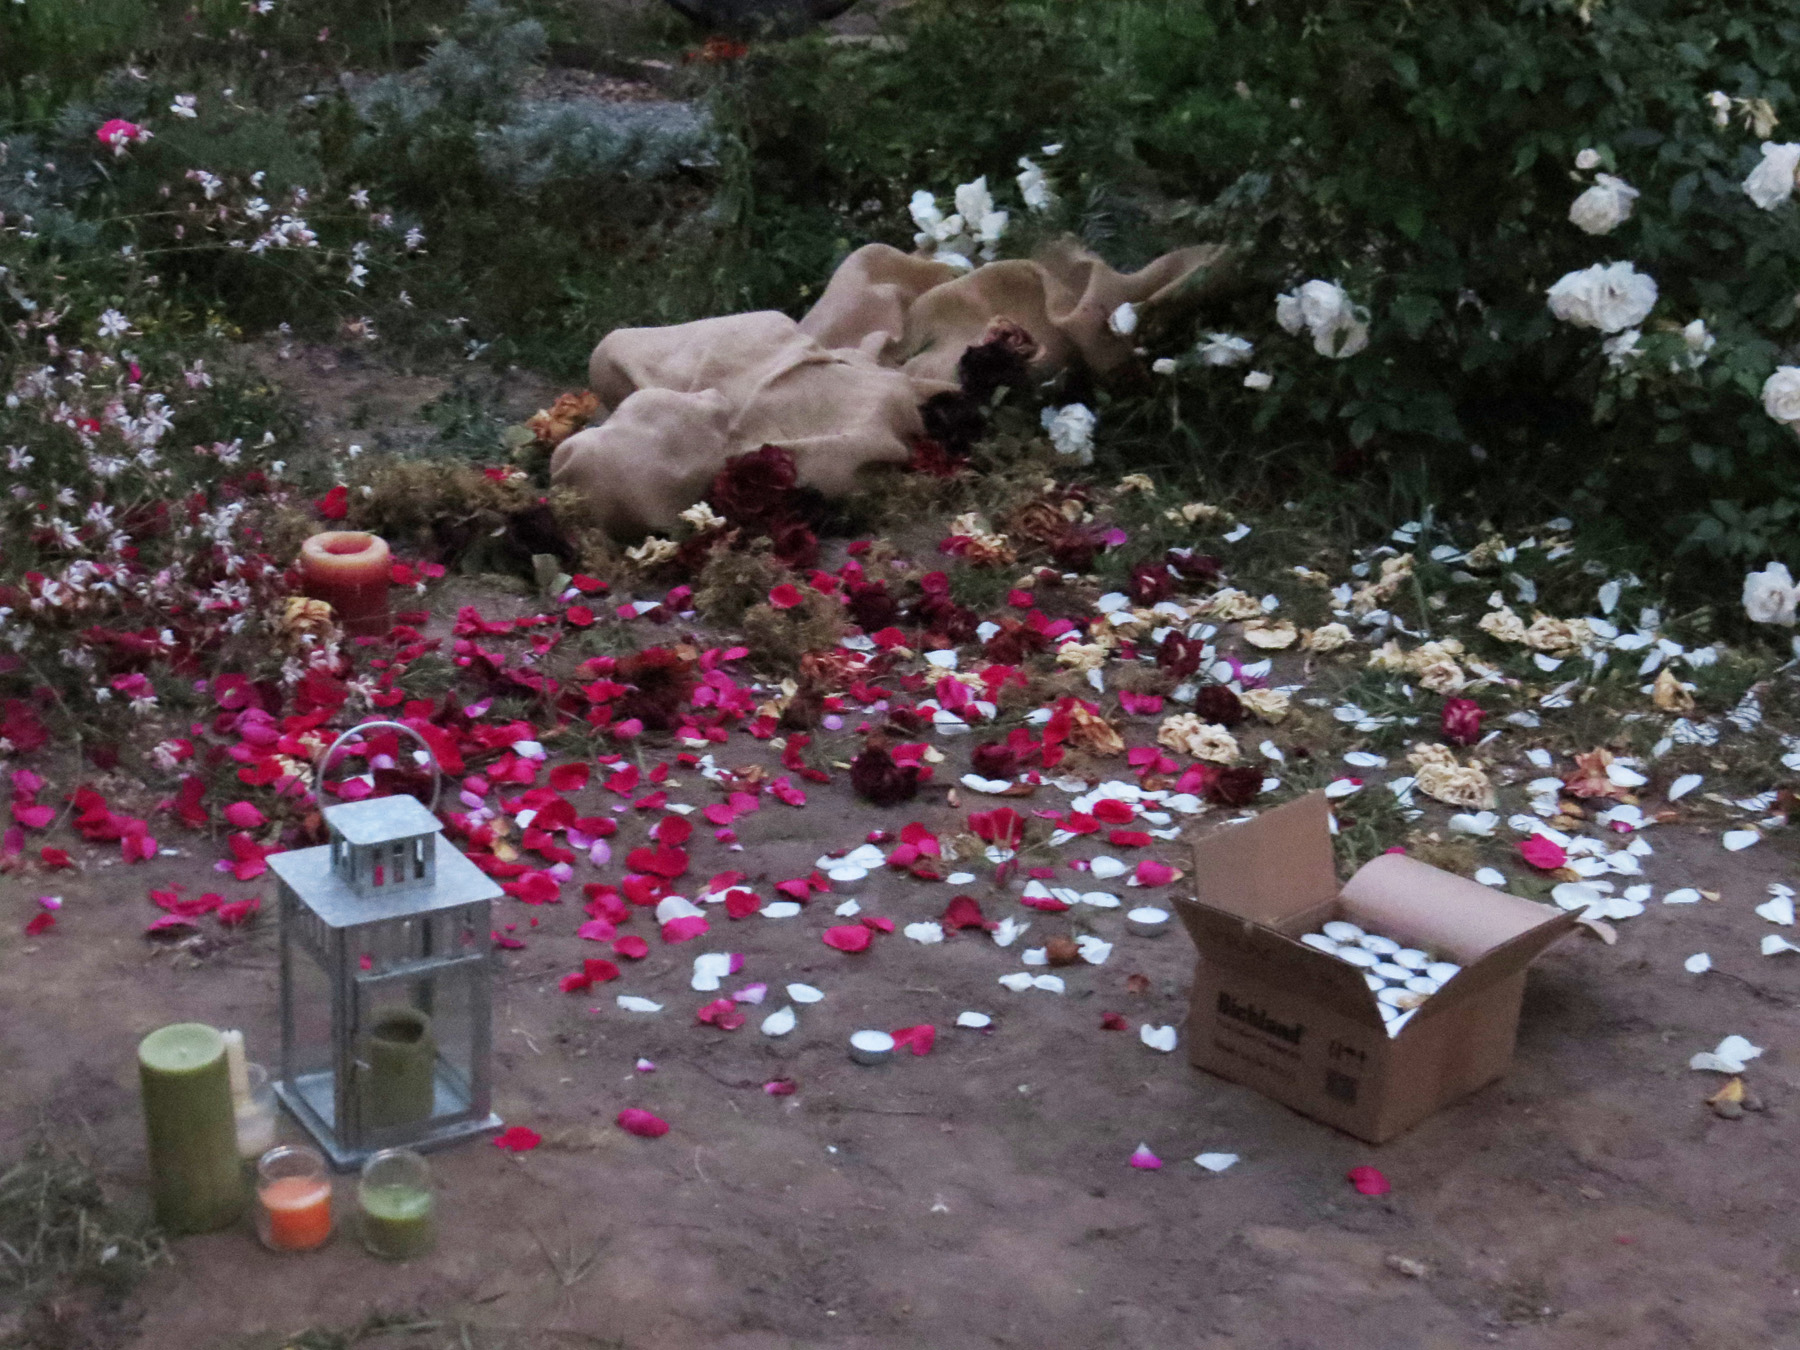
I had been looking around on Pinterest for references for a different shoot and kept coming across photos that made cool use of candles or fire that really inspired me. I haven't really done anything with fire in it before so I thought I would start small with a bunch of little tea lights. I ended up getting so many more than I needed but I suppose that just means I can use them again for something else later on. Anyway, my friend Monica (who is the person behind the mask in these photos) works at a flower shop and is able to get a bunch of flowers easily so she brought me bouquets of old roses and I dried them in the oven. Those dried roses and some extra rose petals from plants already in the garden made up the ground cover.
The idea was loosely based on the idea of someone holding a ritual at a grave yard trying to resurrect a dead loved one. Or maybe just being obsessed with the person, even after death, and spending time with them like this. "The body" wrapped in burlap is an old plastic skeleton that I've had for a few years. I figured it would look alright since it would be covered in fabric.
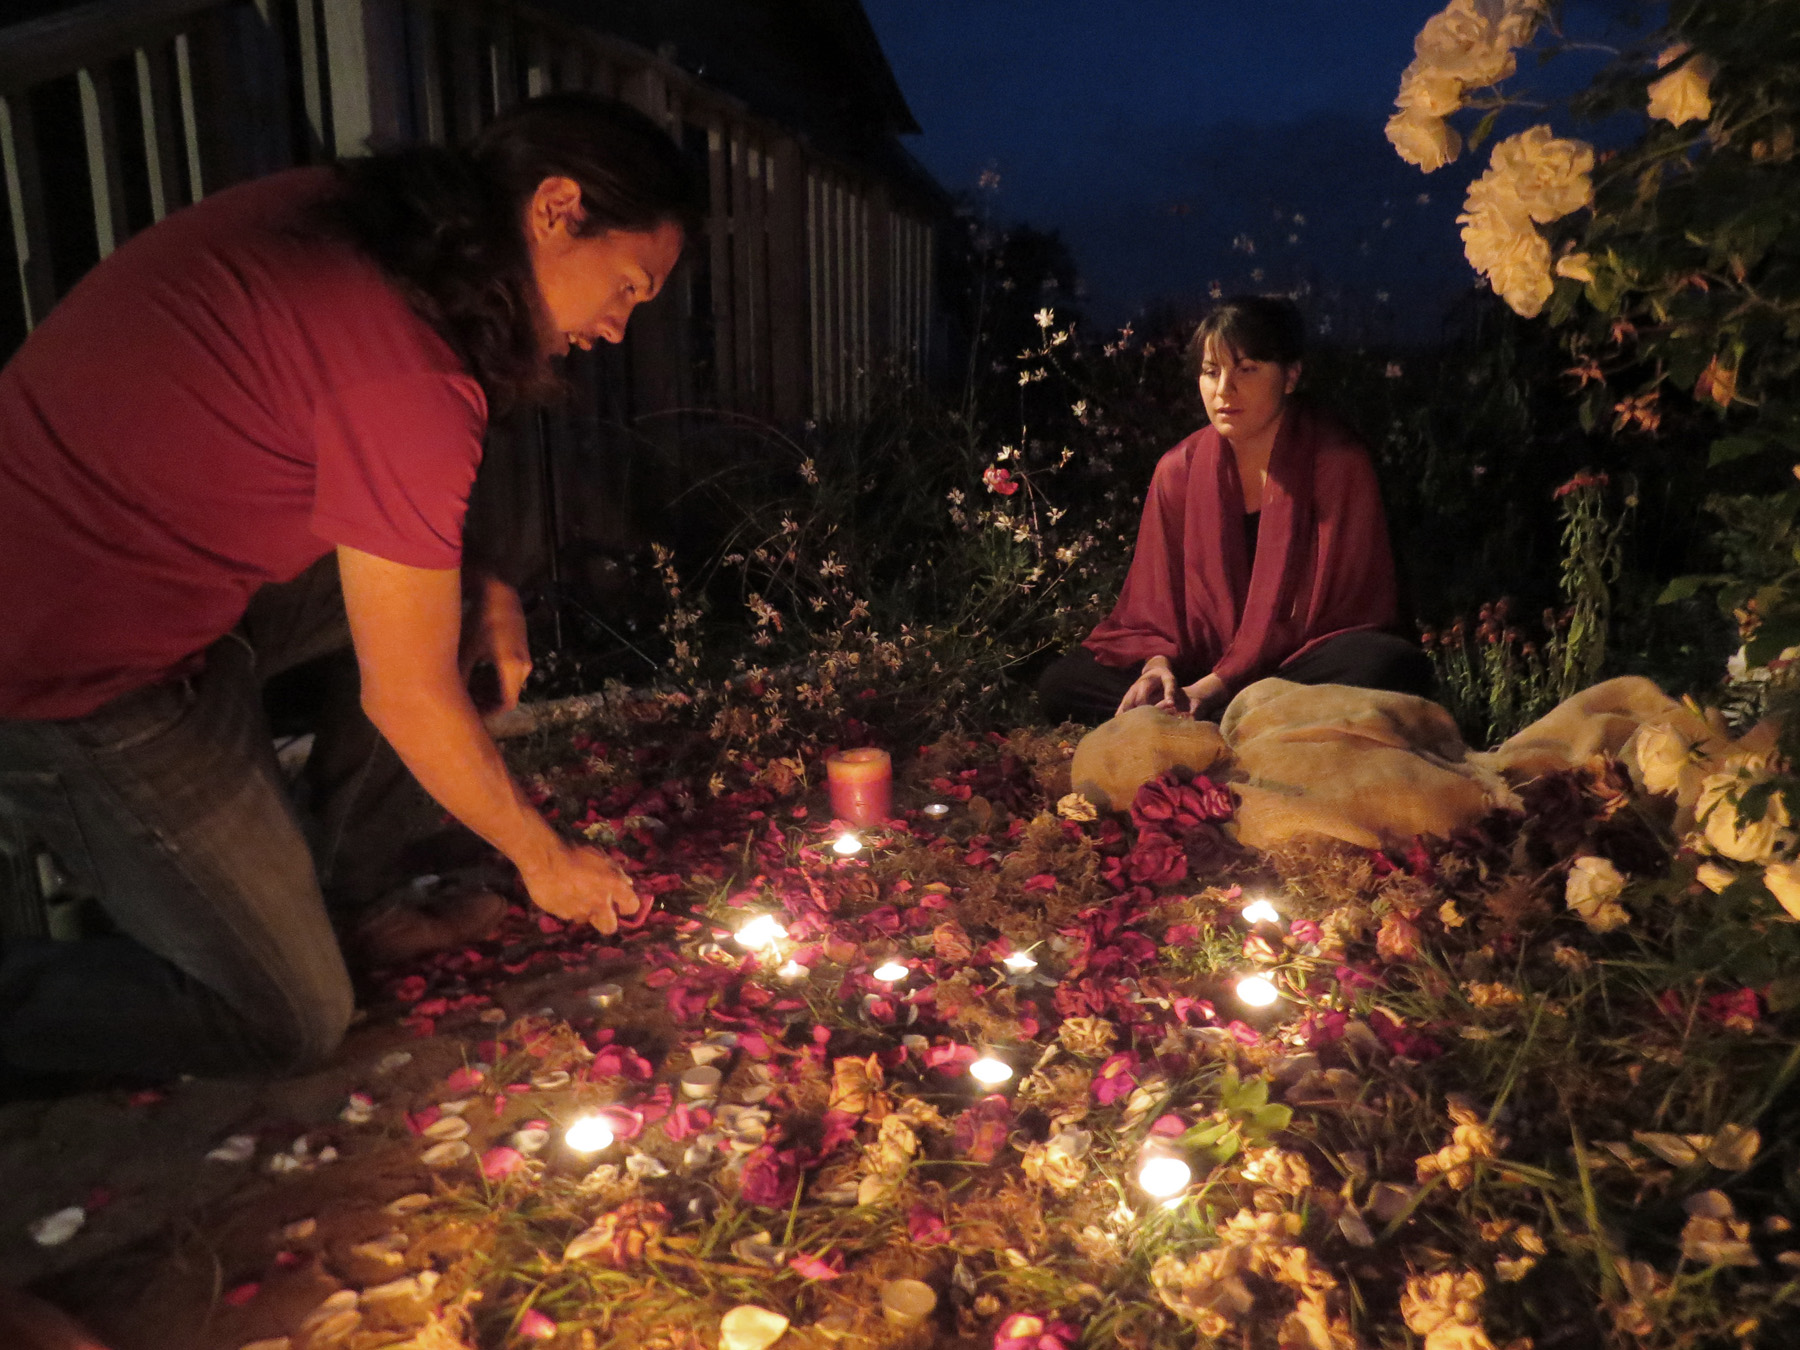
For this shoot I was mostly concerned with the set and atmosphere and didn't really think that much about the actual styling. (Probably should have done more there..) A few days before the shoot I ended up grabbing some nice red cloth to use as a sort of veil and ended up adding in the mask about half way through the shoot.
Before the actual shoot I wanted to get an idea of what the photos might look like so I tried out the fog and some light in my back yard a few nights before. Afterwards I took a quick photo of myself draped in the cloth with my computer's webcam and quickly added it in with Photoshop to make a little mockup:
Above: Quick and dirty Photoshop mockup of the general idea I was going for. I didn't have the candles yet so I just clicked in a few highlights. I liked how the hands and face could kind of be seen like this but during the actual shoot the light was different and I ended up adding in the mask because the human features ended up being hard to see.
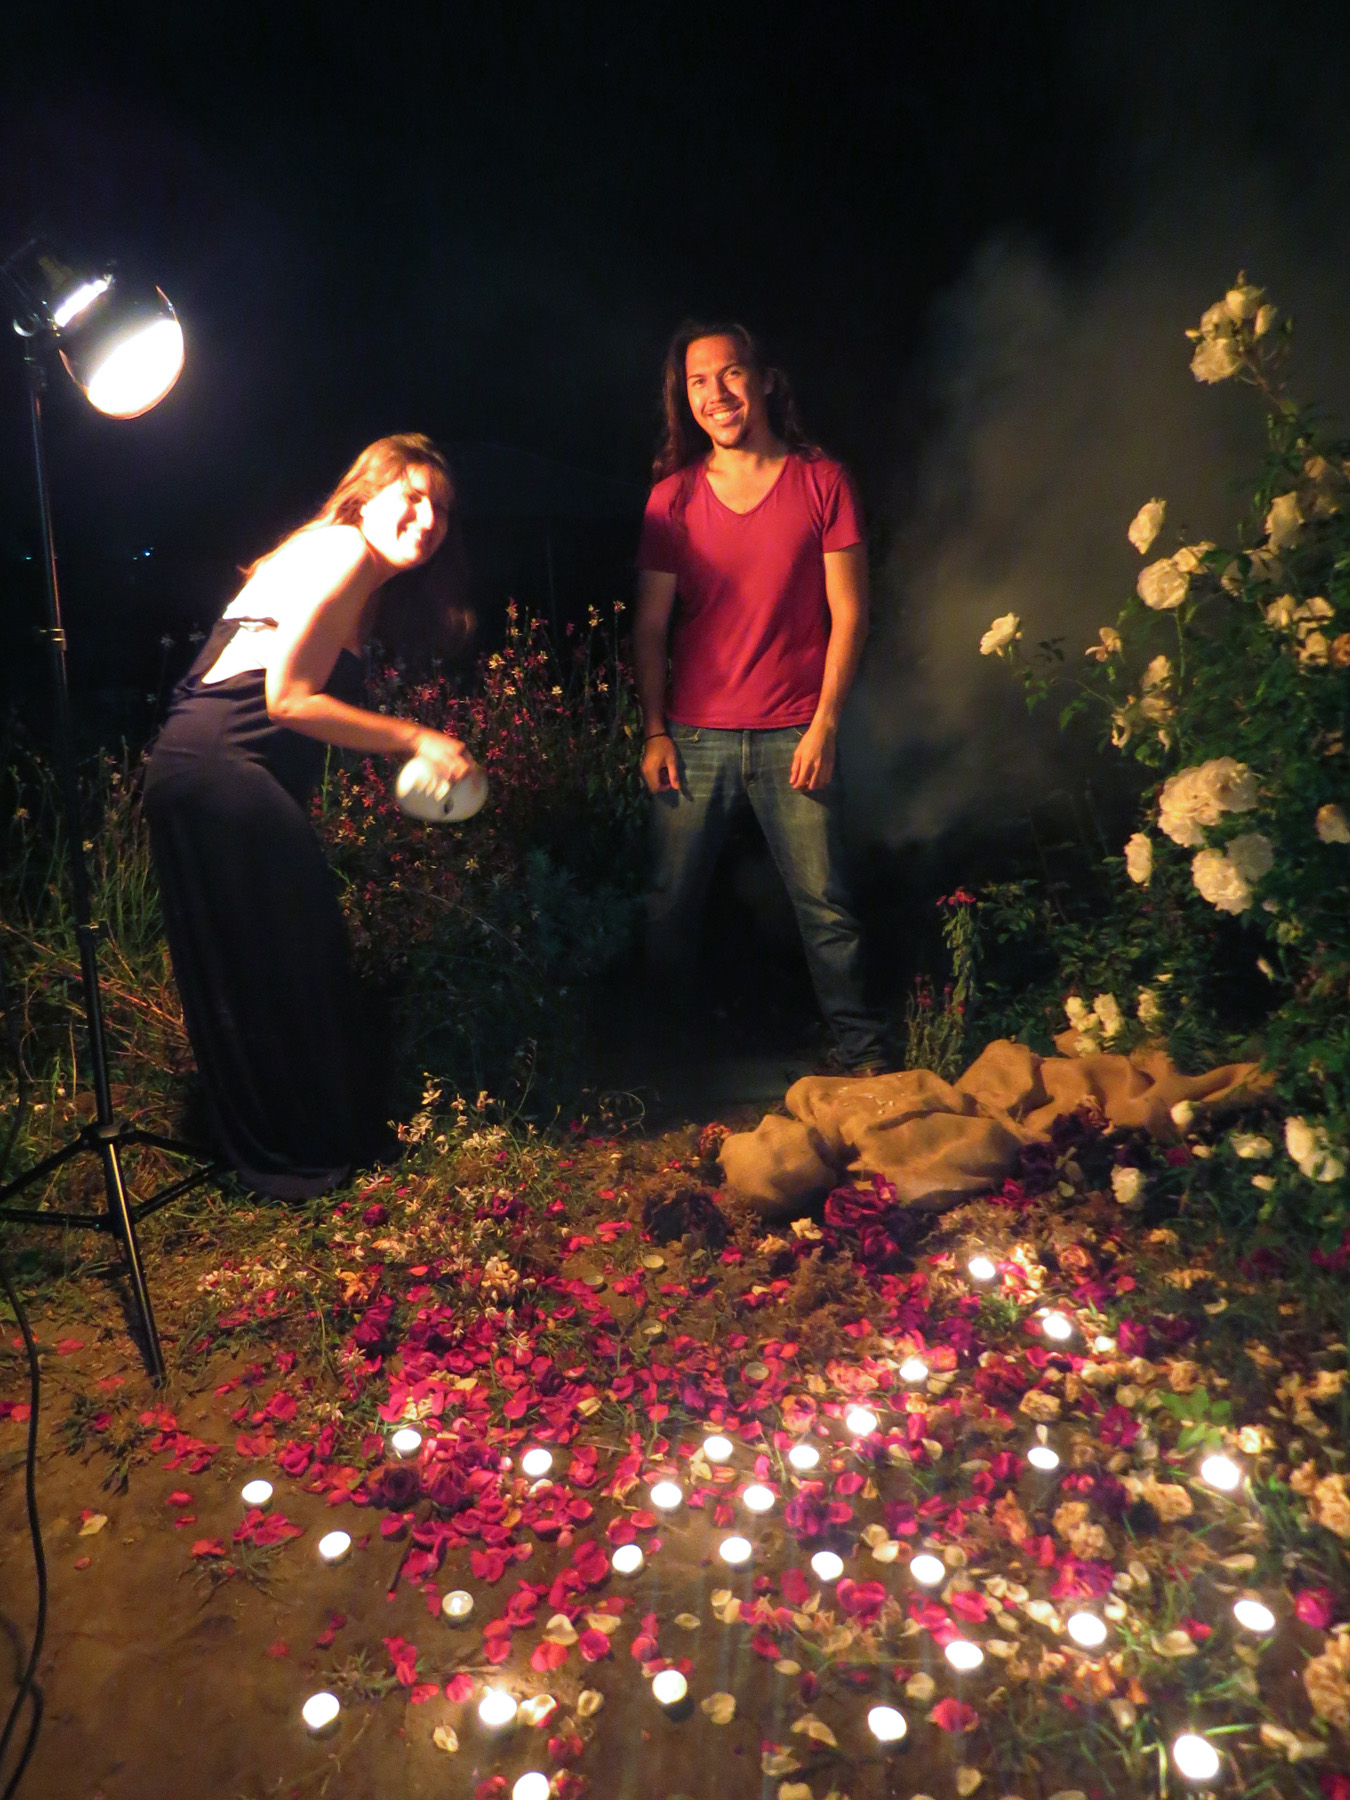
The shoot itself was fun and laid back. My friends Alison and Jade were there as well to hang out and help with things. Since we had to wait till dark to really get started, we had some food and hung around while I leisurely prepared the little set in my back yard. Here are some cool behind the scenes photos that Alison took:

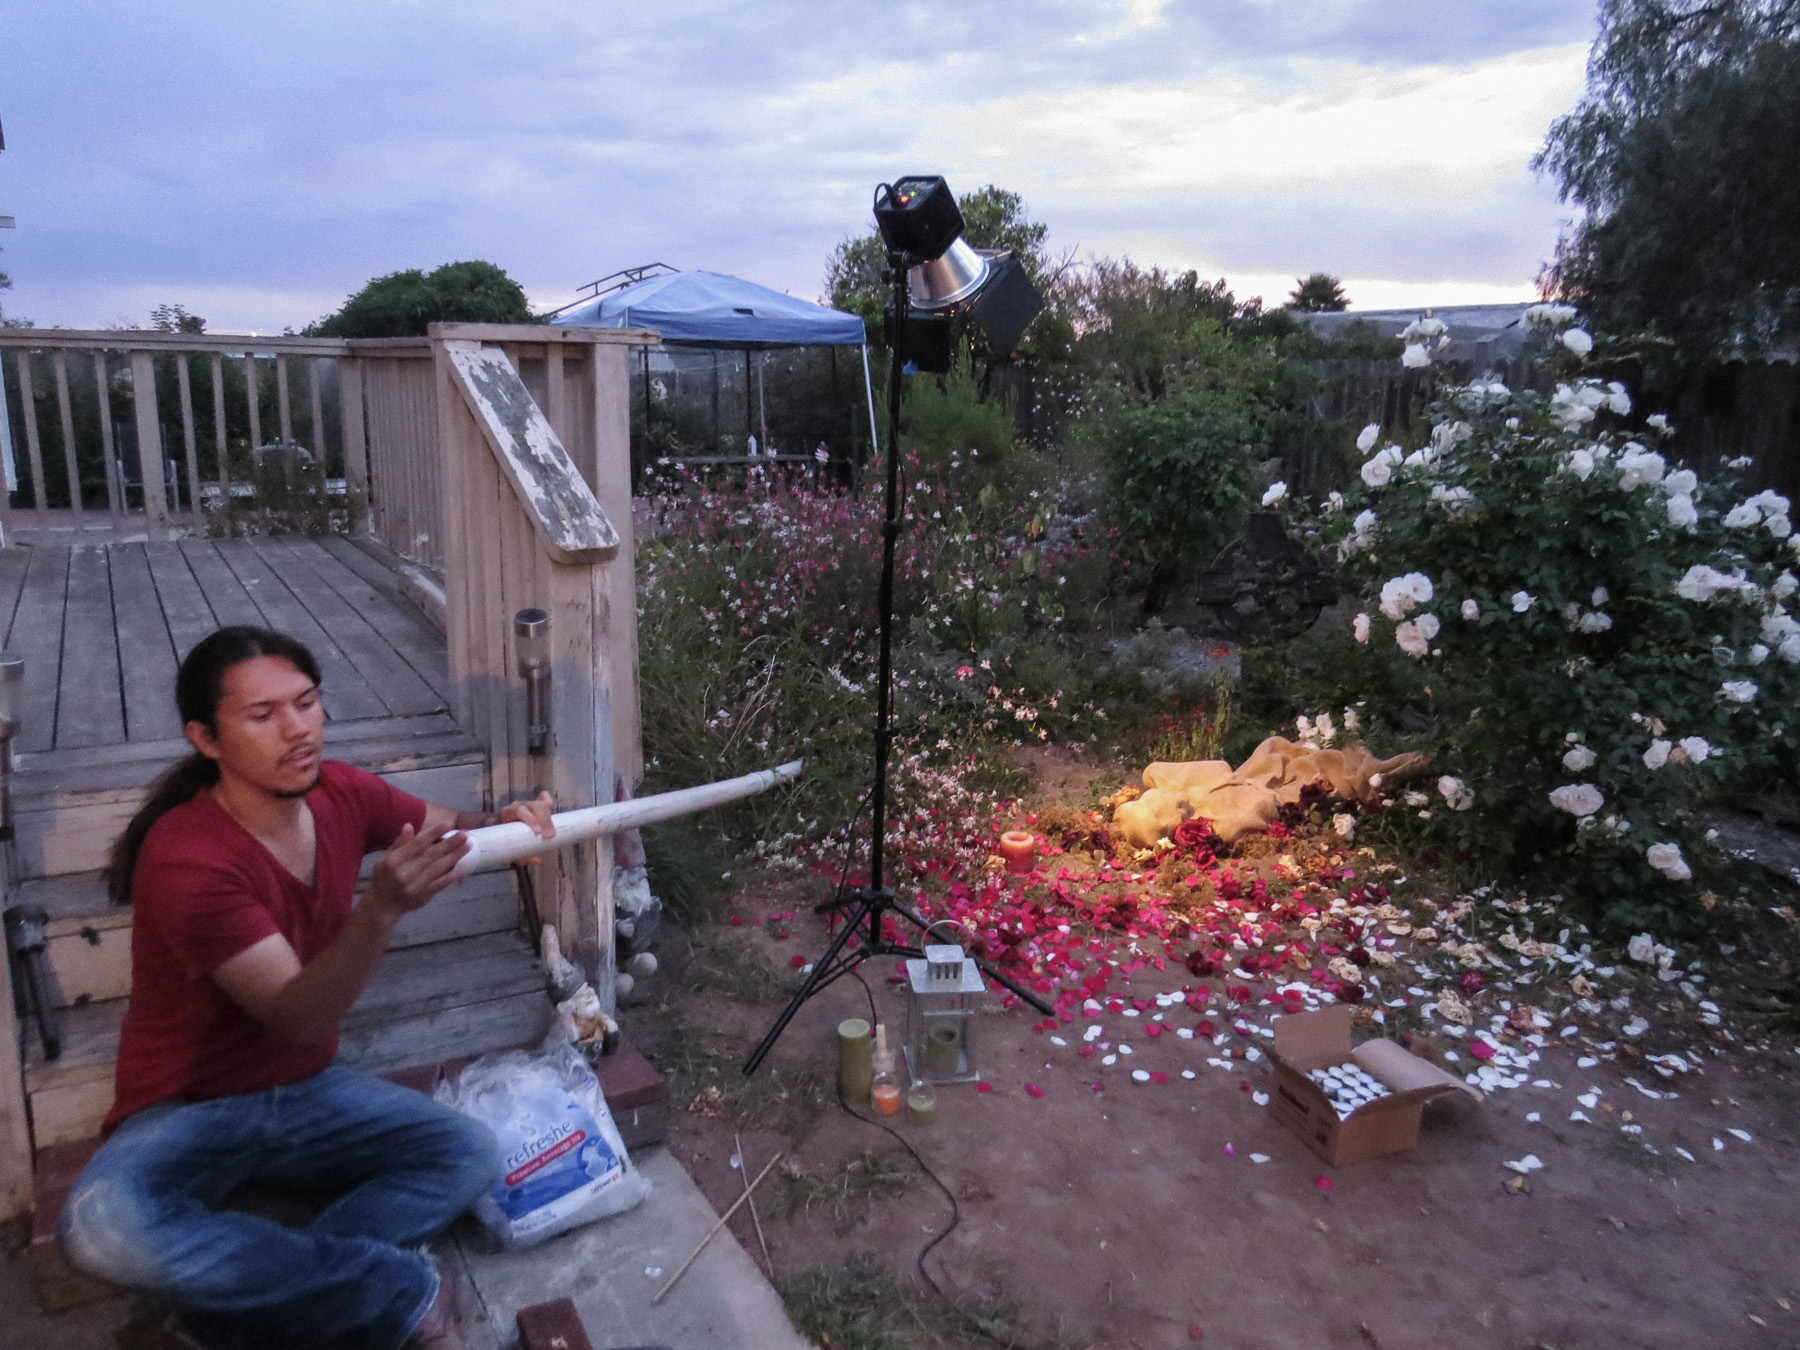
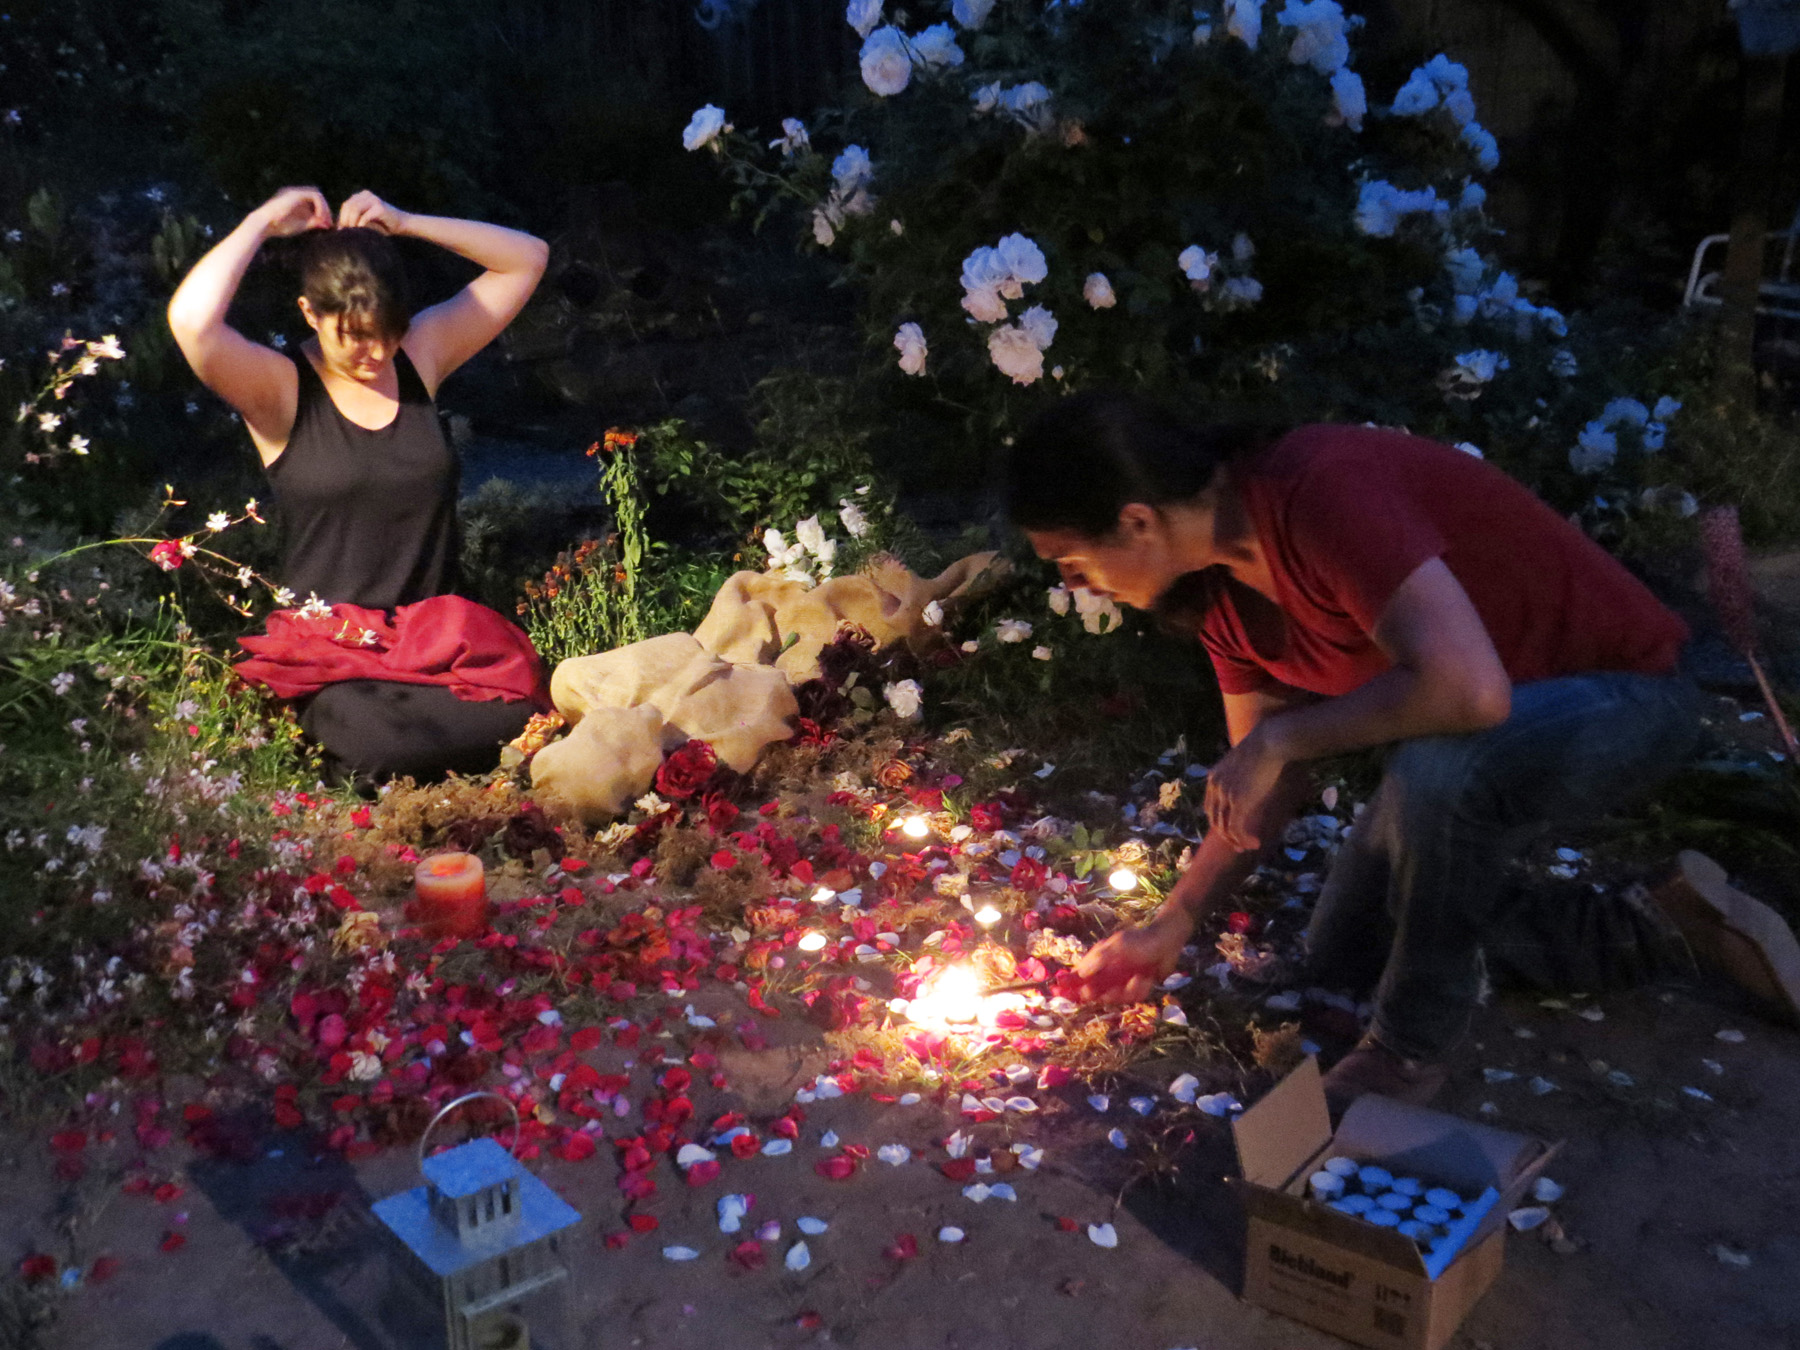
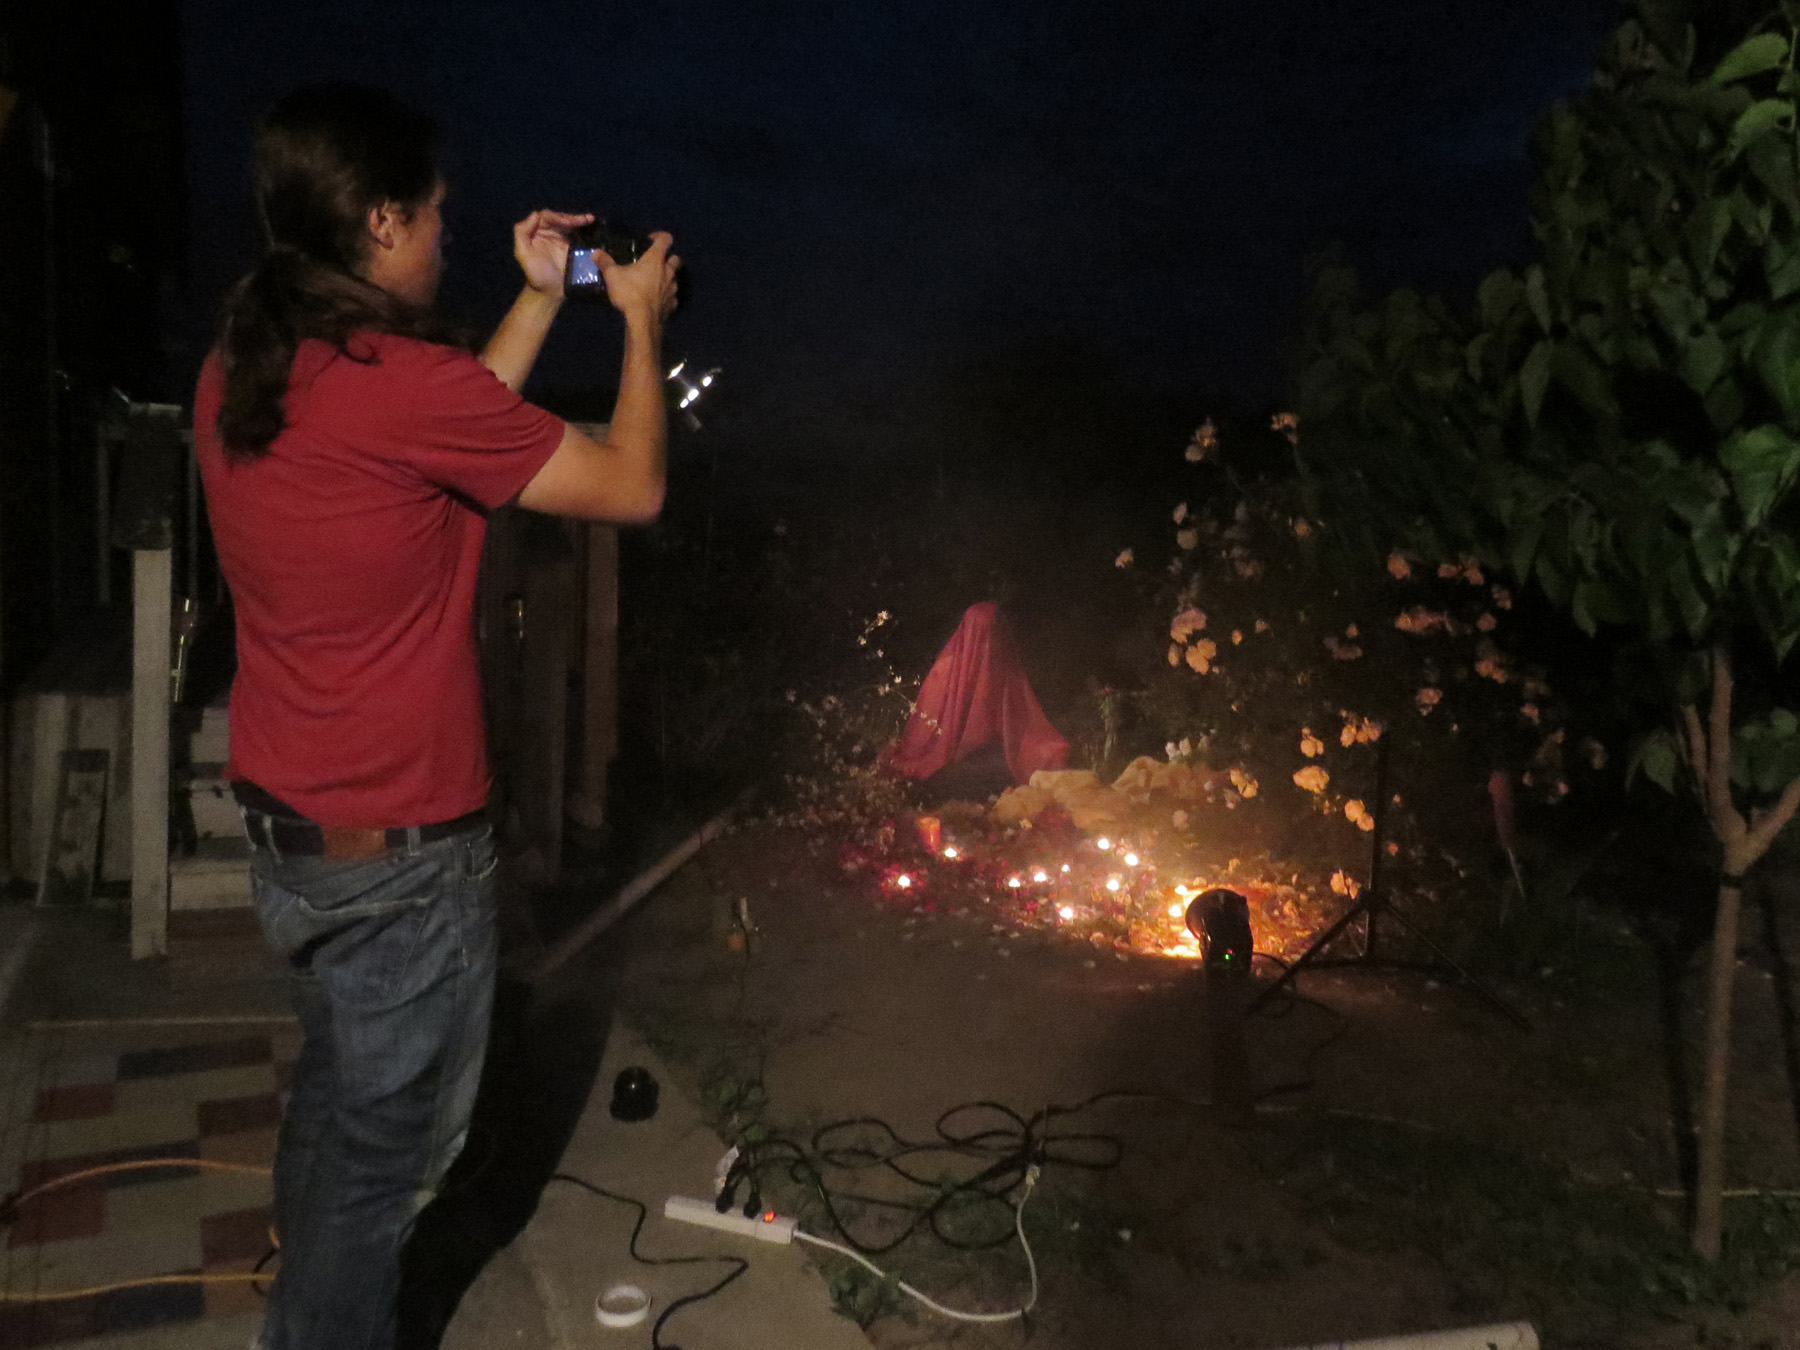
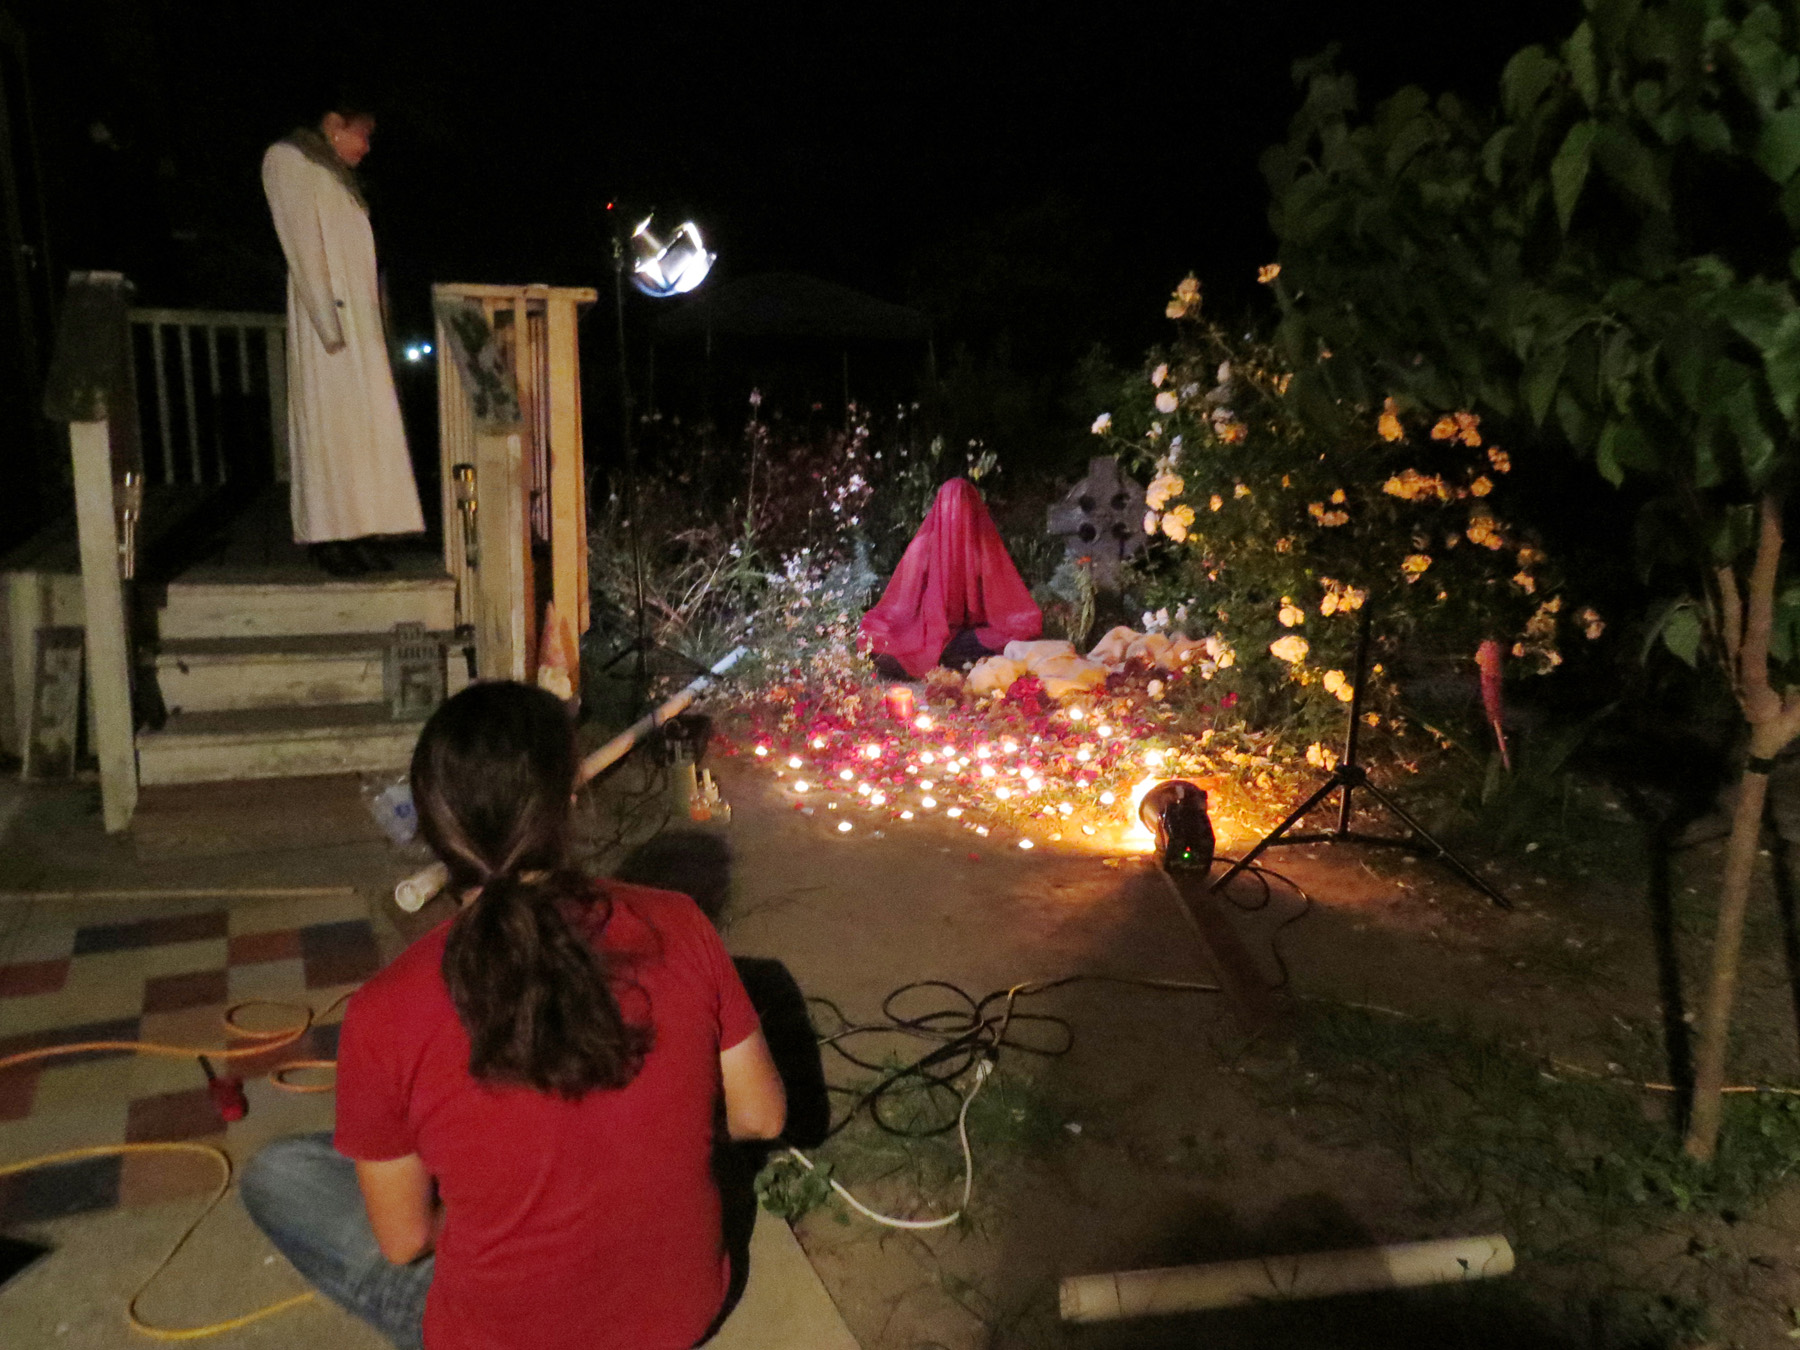
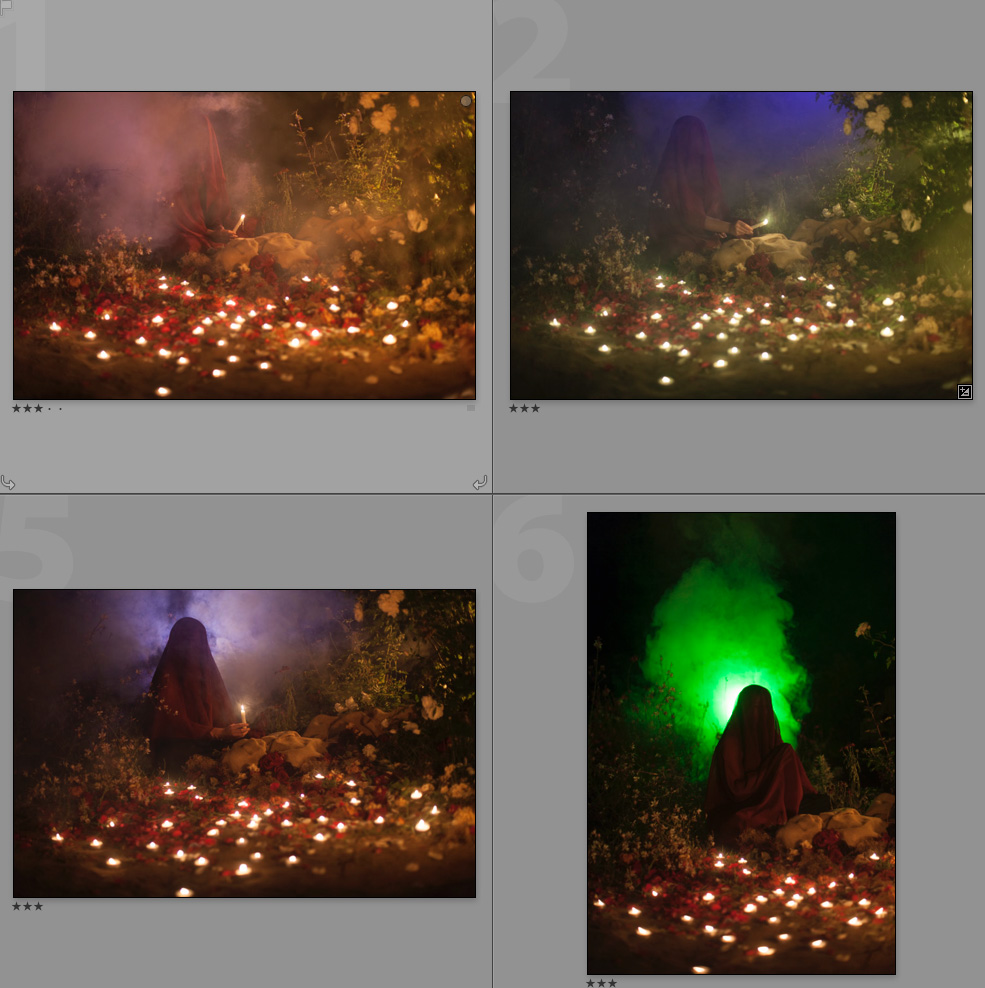
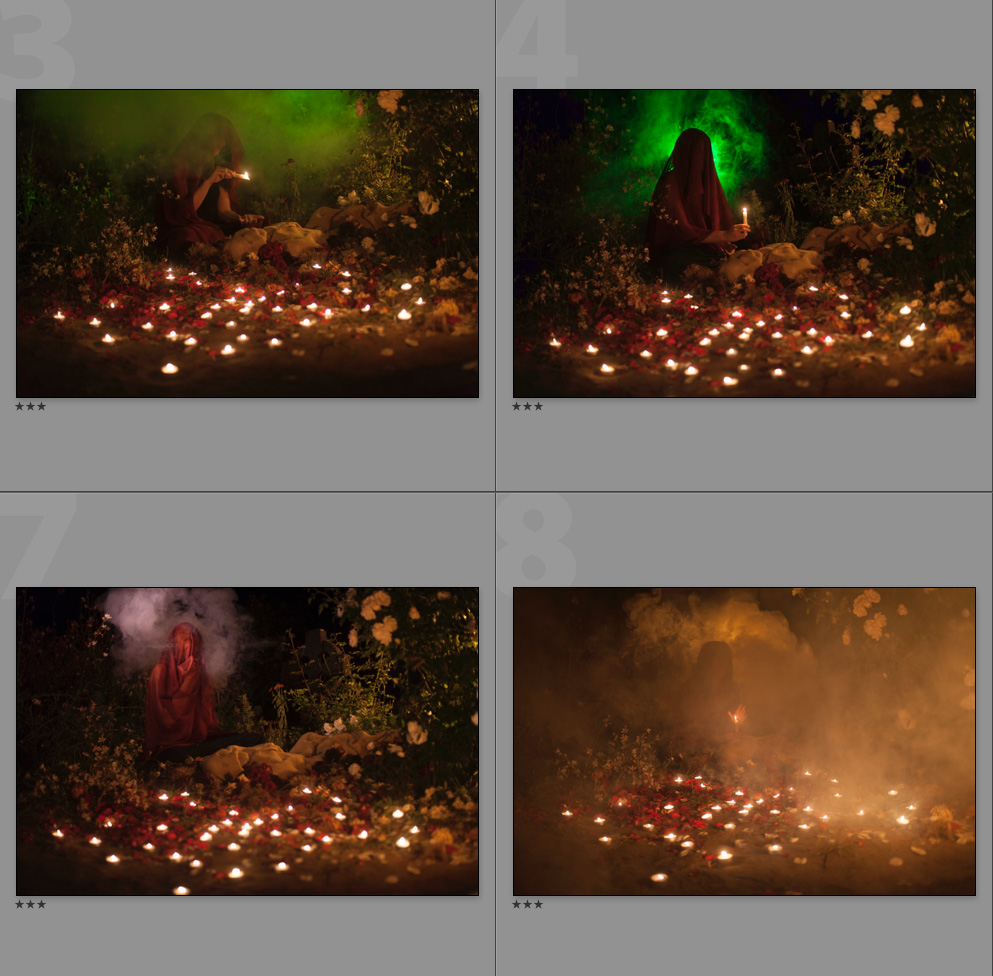
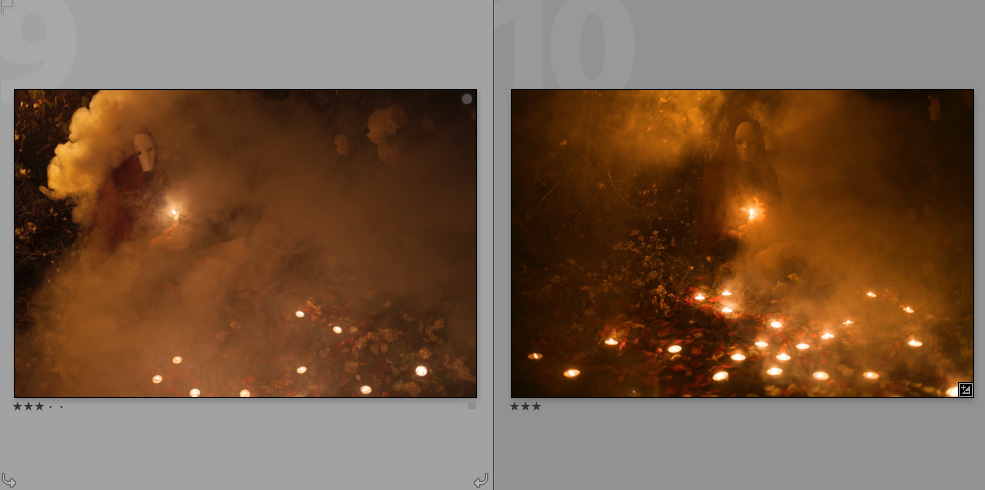
During the shoot in addition to the two hot lights I was using (Ok well yeah they are my usual flashes that I used as hot lights with the built in modeling lights..) I had Jade hold a bright flashlight behind the model to play with lighting the smoke in different ways. We tried a bunch of different colors and angles and I ended up with a lot of different options. Here are a few of the different colors and looks in unretouched screenshots of my Lightroom library:
All in all it was a pretty fun little shoot. It always satisfies me to put things together like this and as usual I try and promise myself that I'll be doing more often. I think that the current fog machine that I have should hopefully last for some more shoots so it will be cool to be able to use that if I want to. And I definitely want to try some things with more fire. Exactly what, I'm not too sure yet but it'll probably be fun.
Here is one more image I finished from the shoot. In general I felt like this shoot was better captured in landscape orientation but I think the portrait shot works alright as well:
Finally used that coffin
One of the final images from the shoot.
A while ago (ok so a long while ago..) I built a coffin that I was going to use for some shoots but I just never got around to doing them. Recently I figured I needed some more new artsy photos so I decided to use it with whatever I had/could scrounge together in a day or two. (The original idea involved a huge amount of rose petals, smoke, and other atmospherics that I just don't have right now.) Luckily, my cousin Brooke is always happy to have new photos taken so I was able to quickly schedule a little shoot while I felt motivated enough to make it happen.
The coffin was built with essentially no planning using the cheapest fence wood I could find at the hardware store. Its actually pretty cool and I'm thinking of making it into a bookshelf or bench or something if I don't need it for more photos.
Setting up the coffin.
For this shoot I didn't want to have to carry everything out to a location so I just set up in my back yard. I had already been working on clearing out some weeds in the garden so there was a perfect spot near some flowers where I could dig in and lay the coffin down.
Decorating the area. I was glad to have found those bags of moss at the craft store.
Originally I wanted to have a bunch of butterflies in the shots but I couldn't find a bunch of cheap fake butterflies so I only ended up getting a few.

I think they look decent enough from far away though it probably would've been much cooler if I had hundreds of them.
It was a little tough at first to find a light setup that worked. I can plan in my head a lot but when it comes to the actual photography, sometimes I just try a bunch of different things until I find things I like. That can be both good and bad. Its great when I can keep moving things around and then finally settle on something that I think looks good. Especially if it isn't what I originally planned for like adding the red gel to one of the lights and turning all the flowers red. The downside is that until I find something I like it can be a little frustrating if my original plan doesn't seem to work and I have to keep changing things because I don't like the way its looking. Regardless, I'm pretty happy with how things turned out. The light is theatrical but I think it works. Here are a couple photos of the light setup. (Its unusual for me to use an umbrella like this, I almost always use my Softlighter with the black cover and the diffusion material but when I pulled the umbrella out of it's bag, it didn't have the black cover on and I didn't want to take the time to find it and then set up the diffusion while the model laid in the cold and the light faded. For my purposes here the light was fine coming through the umbrella like this though I would've liked the positioning control of using the Softlighter as I usual do.)
I had planned to have the burlap showing through in places but in the end I decided to clone in more moss over it.
So yeah, fun little shoot that definitely inspires me to go back to doing more interesting things like this. It has been way too long since I have been doing these kinds of shoots. Its these kinds of things that make me really enjoy photography.
A personal favorite from this shoot. I love how adding the sky made it seem like a totally different place.
I have mixed feelings about this one. I like it but it isn't my favorite of them. I think the most successful ones are the one at the top of this post and the one with the cloudy sky.
Hopefully I'll have more cool photos like this to share before too long.